Installation Time
(approx) 2 Hours
Difficulty Level:
Simple installation for anyone.
Installation Guides
No guide available for this part yet.
FREE 1 to 3-Day Delivery on Orders $119+ Details
Add Details
Change Vehicle Color In Photo
Select Your Color
$494.98 pair
Saved - View your saved items
We're sorry. We couldn't save this product at this time.
or use
Add Local Installation
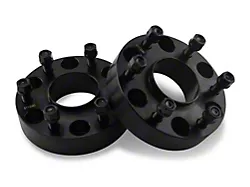
Mammoth 1.50-Inch Billet 6-Lug Wheel Spacers (99-25 Silverado 1500)
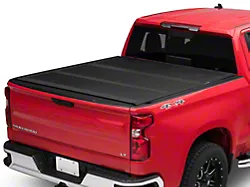
Proven Ground Low Profile Hard Tri-Fold Tonneau Cover (19-25 Silverado 1500 w/ 5.80-Foot Short Box)
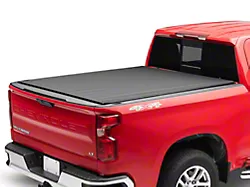
Truxedo Pro X15 Roll-Up Tonneau Cover (19-25 Silverado 1500 w/ 5.80-Foot Short Box & w/o CarbonPro Bed & MultiFlex Tailgate)
Merideth: If you're looking for a step but you also want to keep clearance in mind for your 2019 or newer Crew Cab Silverado 1500, these RB20 Slim Running Boards in Textured Black will be a set that you'll want to check out. Now, getting in and out of the Silverado can be hard, especially for your passengers if you have kids and on top of that have a lift or a leveling kit installed.Now, these running boards will offer just the right amount of room to plant your foot and help you get in and out when it comes to your day-to-day life, but will also be great for the Silverado owner who likes to take their truck off-road or on the worksite and is conscious about their clearance and protection for their rocker panel.Now, not only will this carry a lot of function, but the slim profile and very sleek build will also add a premium feel to the side of your truck if you're in search of that subtle yet sturdy appearance to fill up that wheel-to-wheel space.Now, these will, as it says in the name, feature a super slim design that tucks very closely to that rocker panel, which will offer a very well-fitted appearance, but it's also gonna do a great job at providing some really good protection, especially with this added lip in the back here. Now, these will also offer 5.5-inch width at the widest point and are gonna taper off down to 4.5 inches of width. So, on all points, you are getting a good amount of space underneath your foot, while, again, maintaining a narrower build compared to other wider steps.Now, that slim design also will offer an advantage when it comes to ground clearance, but you won't have to worry even if you do come down on an obstacle or come into contact with anything, because not only will these provide that accessibility and clearance, but protection as well with the heavy-duty build.Diving a little bit deeper into the build and the construction, these will be made of a 16-gauge zinc-coated steel for optimal durability compared to lighter-duty options, making this a great way to keep your rocker area protected from any kick-up and moderate trail obstacles. This will also have a tough black powder coat finish on top that's gonna do a great job at resisting rust over the years and keep them looking brand new for years to come.Now, these will also be direct bolt-ons, so these are gonna come with everything that you need, and it's not gonna require any modification or drilling in order to get these onto your Silverado.Now this set will come in at roughly $525, which I think is right on par for what you're getting out of this kit. Now this set will balance a lot of key elements that you would want out of a sidestep, again, the protective aspect, the additional clearance, the accessibility, and the added bonus that these are going to have a very sleek look.Now compared to other choices that may highlight one or two of those aspects, they may focus on just accessibility or mainly protection. They may not be right for you, but this setup is going to highlight a lot of it and overall going to be a great option if you want all of those key benefits in a sidestep for your Silverado.Now, install on these will be a 1 out of 3 wrenches on the difficulty meter, taking you about two hours to get the job done with some pretty basic hand tools. At this point though, we can head over to our shop and check out a detailed breakdown on how to get these onto your Silverado at home. So that's gonna wrap it up for me. Let's go ahead and get into the install.Man: For this install, you will need an impact, a ratchet, an extension, and a 13-millimeter socket. What's up, guys? Today we're gonna be installing some running boards on our Silverado, so let's get started.So to start things off, we're gonna go ahead and grab our mounting brackets here and get them hooked onto the truck. And you should have two mounting points for each bracket. And there are threaded holes on the bottom and side of your inner box of your frame here. So we're gonna grab our 13-millimeter combo bolts and go ahead and get these mounted.So now we're gonna get our bottom mounting bolt in using our 13-millimeter socket and extension on our ratchet, just because this is kind of a tricky spot to get into in this bracket with getting your bolt in place. So we'll start very slow to get our threads started. Then we're just going to run it in a little bit. We're not going to fully tighten it down just yet. And that'll just kind of set it in place. Then we can go ahead and tighten down our top one. And we have our top one fully tightened. We'll come back and tighten down our bottom bolt. Then we'll go ahead and repeat this process for our other three brackets.So now our forward middle bracket is gonna be right here by our middle body mount. Again, we're going to grab two of our 13-millimeter combo bolts, and we'll get our top one started here. We'll run that in hand tight. We'll go ahead and get our bottom one in, again with our ratchet and extension, 13-millimeter socket. We'll tighten these down. We'll go ahead and move on to our next bracket. We'll go ahead and get our rear middle bracket in place. Get our upper bolt in. Get our lower one in. Again, all of these are the same exact process.We can go ahead and install our rear bracket. And for your rear bracket, it's pretty much going to be right below your rear body mount. Now you do have back here two that are pretty close, so you could choose the more forward or the more rear one, whichever one you prefer. We're actually going to go with the more forward one for these running boards, just because they taper in, so it's probably a better idea to go with these. We'll get our bottom one in just like before. We'll go ahead and tighten them down.Now that we've got our brackets in place, we can go ahead and start mounting our running boards. So now we've got our running board flipped upside down here to kind of demonstrate how our brackets that are going to be inserted are to go in. Now you notice they have a U shape and you want it to exactly face up when it's right side up. So right here would be down. So we're gonna fit these in sideways here and then turn them. And that's how they're going to go in place. Now you can put the running board on the brackets and then do this, or you can do it this way. And we're just going to get them kind of generally laid where they're supposed to go. They will move around a bit but we'll get them back in place. They're very easy to access. But we just want to show you how they're supposed to sit. Figuratively this one wants to run away. We'll go ahead and get all four of them in.Now we'll go ahead and set our running board into place on the brackets then we can begin getting them mounted. So now we've got our brackets lined up with our mounting points for our main brackets on our chassis. So we'll go ahead and grab eight more of our 13-millimeter combo bolts, two for each bracket. We'll go ahead and get this started. Now these may move around a bit while you're trying to get them started, but you can easily reach up and hold them with a single finger. And now that we've got those started, we'll do the same thing for the rest of our brackets, and then we'll come back and tighten them all down.So now that we've got all of our bolts in hand tight, we can make any adjustments we need to make to where we want our boards to sit, whether forward or back towards the end of the truck more. And once you have that set, you can go ahead and tighten them all down using your 13-millimeter socket and your impact. Then we'll go ahead and do the same thing for the other brackets. Once you have this process complete for this side, you can go ahead and repeat these same steps for the other side.Alrighty, guys, that about wraps up our review and install of our RB20 Slim Running Boards in Textured Black finish for your '19 to current Silverado 1500 Crew Cab. Thanks for watching. And as always, for everything Silverado, keep it right here at americantrucks.com.
View Full TranscriptNow Playing
2019-2023 Silverado 1500 RB20 Slim Running Boards; Textured Black Review & Install
10:45
Subscribe: New Silverado videos daily!
Subscribe to our YouTube Channel
Features, Description, Reviews, Q&A, Specs & Installation
Brand | Go Rhino |
Side Step Finish | Black |
Side Step Type | Fixed |
Convenient Step-Up. If you’re looking for a convenient step-up for your truck, then purchase these RB20 Slim Running Boards in Textured Black. These running boards offer a 5.50-inch-wide step area to ensure your safety as you climb in and out of your vehicle. Furthermore, they’re crafted with a bullet-stamped surface, allowing dirt and debris from your shoes to fall down.
High-Strength Construction. These running boards are made of 16-gauge zinc-coated galvanized steel, making them tough against impacts and road debris. They are also applied with a textured black powder coat finish to fortify their defenses against the corrosive effects of various road and weather elements.
Direct Installation. Installing these running boards is easy since they’re designed to directly mount to your vehicle’s existing points. When mounted, they sit closer and tighter against your vehicle, allowing them to provide more clearance. Plus, these running boards don’t require any drilling for your convenience.
Application. These RB20 Slim Running Boards in Textured Black are made to fit 2019-2025 Chevrolet Silverado 1500 Crew Cab models.
Fitment:
Go Rhino 69404887SPC
CA Residents: WARNING: Cancer and Reproductive Harm - www.P65Warnings.ca.gov
Installation Info
Installation Time
(approx) 2 Hours
Difficulty Level:
Simple installation for anyone.
Installation Guides
No guide available for this part yet.
What's in the Box