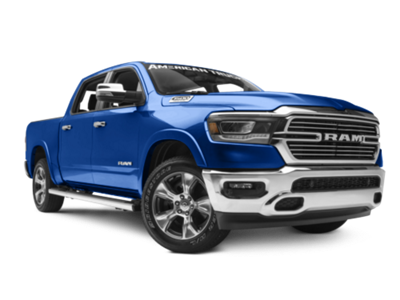
 2019-2025
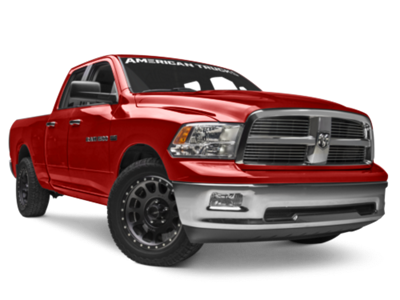 2009-2018
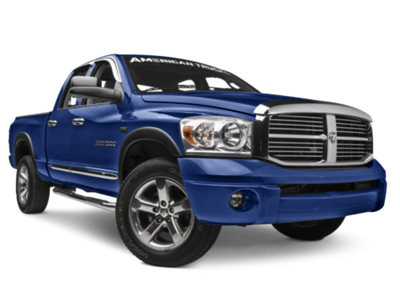 2002-2008


Installation Time
(approx) 1 Hour
Difficulty Level:
Simple installation for anyone.
Installation Guides
No guide available for this part yet.
 FREE 1 to 3-Day Delivery on Orders $119+ Details
Add Details


Change Vehicle Color In Photo
Select Your Color
Verify parts fit & get product recommendations
M-F 8:30A-11P, Sat-Sun 8:30A-9P
 197 Reviews
2 Answers
197 Reviews
2 Answers
Will this fit your Vehicle?
Saved - View your saved items
We're sorry. We couldn't save this product at this time.
or use
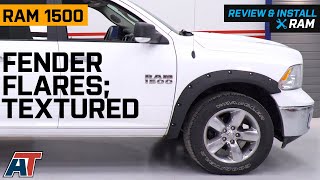
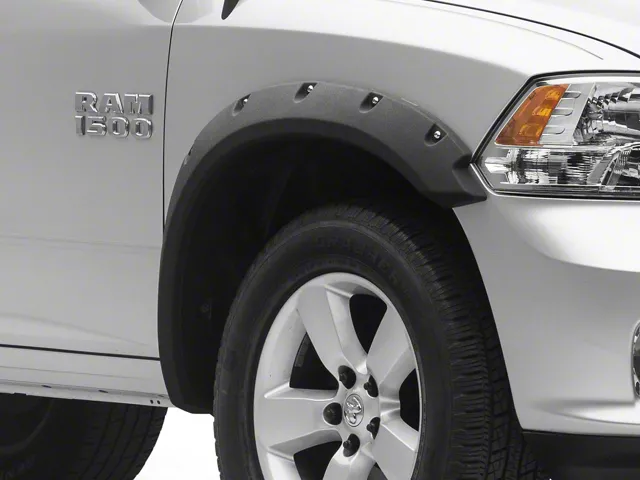
Hey, guys, Adam here with americantrucks.com. And today, we're taking a quick look at and installing the Fender Flares in the Textured Finish, available for the '09 to '18 RAM 1500, excluding the RT and the Rebel model. You should be checking these out for a couple of reasons. You might want to just get an off-road aggressive appearance for the exterior profile of your truck. You might be looking for additional tire coverage for some aftermarket wheels with a more aggressive offset. And you might be also looking to protect your paint from rocks, debris, and other mud flicking up at your truck's body. These fender flares here are going to attach right to the sides of your factory fenders to provide additional coverage for your paint and tires. Now, covering your paint is crucial. These trucks, whether it's an old truck or a new truck is an investment. You want to protect your investment. Replacing or repainting or refinishing your clear coat can be pretty costly, so protecting them off the bat is going to do a lot to keep you safe. Now, these fender flares are going to give you that extra coverage, about 5 inches of extra coverage for the fenders and for additional poke, which is going to help protect your paint from debris flicking up at it, especially if you've got wider tires.Now, if you picked up aftermarket tires, whether it's just a more aggressive mud-terrain or if you've got a more aggressive offset on your wheel, your tire is just going to be a little bit bigger than factory. That means you have more stuff getting kicked up at your paint, and that means your tire is more exposed to the outside of your vehicle. Negative offset is going to push your tire to the outside of your truck. In some cases, it's no longer street-legal. Now, if you're looking to keep your vehicle street-legal or protect your paint, these fenders are going to provide additional coverage over your tire to do both of those things. Additionally, it just looks really, really good. These fender flares do add that aggressive off-road styling. Even if you're not taking your truck to the trails or the campsite or the worksite, it just gives you that aggressive finish. The actual fender flares are made from a durable polypropylene. They're just really a durable and flexible plastic, so they can flex with the body of the vehicle. And they're also going to have a textured coating on top of it. That textured coating just adds a layer of ruggedness to it and makes it look like it's just that much more durable. It's also going to include some fake rivets. Now, I say that lightly because they are actual real bolts that make it look like it's bolted to the side of your truck without you having to actually drill anything. These are going to use pre-existing holes inside of the wheel well or they'll require you to drill, which I'll talk about in just one second. In addition to the chrome hardware, you're also gonna get weatherstripping that'll go along the edges there to help give it a seal up against your truck and also prevent the plastic from rubbing up against your paint, it adds that protective layer.Now, the price tag for these comes in right around 250 bucks, and it comes as a set of 4. The fronts are a little bit different than the rear because they are going to curve around that headlight design, but they're going to work with the '09 to '18 gen. The rears are pretty straightforward. They just go from end to end. Getting back to that install. Now, the install I'm giving one out of three wrenches on our difficulty meter. Anybody can tackle this in the driveway at home with about an hour, maybe hour and a half from start to finish. It's going to require very simple hand tools. It can be a bit time-consuming depending on your expertise. You do have to line the edges with that weatherstripping, which can take a little bit extra time there. Now, when it comes to the drilling that I mentioned, some trim packages may not have the pre-drilled holes and 8-millimeter bolts inside the wheel well lining there, in which case, you may need to drill yours out. Now, our truck did come with those holes pre-existing so we didn't have to drill. Very few packages out there won't have those pre-existing holes. But just keep in mind, you want to check in on yours to see if the drilling will be required, in which case, it will beef up the difficulty just a little bit. With that said, guys, I'm going to show you every step of the process here from start to finish. Let's get started.Tools used in the install include an impact gun, couple of ratchets, 3/8 and 1/4-inch, 8-millimeter swivel socket is recommended but not required, 8-millimeter deep socket, 12-millimeter deep socket, T40 Torx bit, but there's also a bit included in the hardware, Phillips head screwdriver, pair of snips, and I'm recommending some super glue just to help with applying the weatherstripping.First up here, we have to start with assembly. We've got our fender flare for our passenger side front on the table. We're just going to show you guys on this particular one, and then you'll repeat this process for all four. You're basically going to start by taking the Torx screw or Torx bolt with a washer on it, pop it through the front. You want to make sure you have your fender flare on a table with a gap underneath, and then you want to put your nut underneath it. You're just going to need a big space to be able to get underneath with tools as well. So, my suggestion is to hang it off the table, just like this. So, you're basically going to do that exact same thing for all seven open holes, and then we'll come back and tighten them down. Now, you can grab a T40 Torx bit or the tool included in the kit for your drill. Grab a ratchet and a 12-millimeter deep socket, and you're going to tighten these guys down. I'm gonna put the socket on the nut on the bottom just like that and tighten it down from the top. You don't want to overtighten it because it is plastic, so you don't want to go too hard on it. Put your impact gun if you're using one on one of the lower settings, just make sure they're nice and snug. And then repeat that for all of them.Next step here, we have the line the outer edge, the edge that will actually contact the paint on the truck with this weatherstripping. That's going to make sure it's got a leak-free seal on there. And it's also going to protect the paint from the plastic rubbing up against it. Now, there are some caveats here I want to mention. The weatherstripping here on the inside of the lip has 3M lining on the inside. Now, the 3M inside of that is kind of sticky, but it does tend to pull off as you're working your way around, in which case, I'd recommend either picking up some serious adhesion promoter, picking up some more durable 3M tape, or use my solution, which is going to be some Loctite super glue. Now, this method is just going to help get the weatherstripping on the actual product. Once the product is installed on the truck, the tightness, that really, really tight bond it's going to get what that truck is going to help keep that weatherstripping on. This is just gonna help keep the weatherstripping on long enough to get us onto the truck. With that said, I recommend picking up something like this. It's about 2 bucks or so at your local auto parts store. I'm just going to dab it around the edge as I lay the 3M on, it's gonna help give it a really, really good bond. And we don't have to mess with switching out the 3M or grabbing adhesion promoter. This is just going to work just as well. So, I'm going to start here on the edge and I'll work my way all the way around. You're only lining the outer edge that contacts the truck. If you need to, pick your fender flare up, line it up on the truck to get a good idea of what edge that is, and then you can begin. Just work your way from one side to the other and repeat for all of them.So, basically, I'm just taking this and I'm not doing a whole lot. I'm just going to line the edges there with this glue just to help give it a good bond. Only doing a little bit at a time. I peeled off the red 3M backing on the inside. Now I'm just going to line this guy up. You want to make sure that you're lining the weatherstripping correctly as well, it only really goes on one way properly. Lining these corners are going to prove to be pretty tricky. You may need to put a little bit of extra in there just to get that guy to hold. We can also come back to that edge at the end to make sure it's seated properly. All right. Once you finish all the way to the other edge and everything is secure, you like the way it's lined up, repeat this exact same process for the bolts and weatherstripping on all four fender flares.So, we got the assembly portion of that out of the way. We did all four corners on the table. Now, you want to look at your front passenger side fender well first. That's where we're going to start. Now, each of the fender flares are labeled front left, front right, rear right, rear left on the inside there, so determine which one you're going to start with. First thing you want to do is hold your fender flare up to the fender here. You're basically going to see where the holes on the bottom of the fender flare line up to the holes inside the wheel well. You'll notice we have a factory bolt here, a couple of open holes, factory bolt, factory bolt. Those are the locations we're going to be tightening it down to. Some of those holes will be used. Some of them won't be and we're just gonna be covering them up. Now, the factory bolts we are going to be using. Anywhere that there's a factory 8-millimeter bolt there, you're going to reuse that to tighten down the fender flare. And then you're going to determine where an open hole matches an open hole in the fender and put in one of these clips. That's where I'm gonna start first. I already lined mine up, so I know which holes I'm using. And I'll show you guys that in a minute. I also know that I'm going to be using this hole here. So, let's put this threaded clip in that hole so we can put a new screw there.Now, before I start this, I should note that each truck and trim package may differ a little bit. So, you want to make sure you're lining up your fender flare to your wheel well so you can see which holes you're using. I know that I'm using this one here and it didn't come with factory hardware there. So, I need to put this threaded clip in just like that so the screw included in the kit can tighten down to that. Now, at this point, we can start taking out all of our factory bolts. Starting at the front end of our wheel well, I'm going to be out these two factory 8-millimeters. Again, yours may slightly differ in position and size. Just get those guys out of the way. I'm using an 8-millimeter swivel. All right. Remove the rest of them. For this, I'm switching over to a ratchet to get this last one out. Now, we can put our fender flare into position and put the factory bolts back through. So, now, carefully take the front fender flare and line it up. Now, you don't want to alter any of the weatherstripping. So you want to be extra careful there. Once it's on really tight, it'll hold itself in position. Put the factory bolt back through. From there, I'm going to take my socket and tighten that guy down. Now I'm not going to overtighten it, just get it nice and snug so it helps to hold it in.All right. So, now I've got the other side of the fender flare in place. I'm lining up those holes. Wanna basically put one bolt on each side to help hold it in. And then from there, tighten those guys down. Sure that's in. Now, we can start putting the rest of our factory hardware in. All right. So, this is the new screw included in the kit we're putting through the U-nut clip that we put on the top hole. Now, we can repeat this for the other side. Starting off on the passenger side rear, I'm going to start by putting one of those clips on the dead center top hole, the top open hole of this rear wheel well liner. All right. Now, we can start taking all the factory bolts out. All right. Now, you can take your fender flare, set it into position, and tighten it down with factory hardware. All right. So, now we can take the fender flare, set it up into position, line up the holes, and use the factory hardware to tighten them down. Okay. Repeat that for all of the open factory holes and then tighten down your hardware. All right. Now, we're dead center for the new hardware as well and tighten it down. All right. Repeat for the other side, and you're good to go.That's gonna wrap up my review and install for the Fender Flares in the Textured Finish, available for the '09 to '18 RAM 1500, excluding the RT and the Rebel model. Get yours right here at americantrucks.com.
View Full TranscriptNow Playing

2009-2018 RAM 1500 Fender Flares; Textured Review & Install
13:06
Subscribe: New Ram 1500 videos daily!
Subscribe to our YouTube Channel
Features, Description, Reviews, Q&A, Specs & Installation
| Fender Flare Install Type | Drilling Required |
| Fender Flare Material | Plastic |
| Fender Flare Finish | Textured Black |
| Fender Flare Size | Wide |
| Fender Flare Style | Flat |
Protects Against Road Debris. To prevent your body and paint from getting damaged, equip your truck with these Textured Fender Flares. These fender flares are designed to protect your body panels against mud, rocks, and other road debris.
Made of Polypropylene. These Textured Fender Flares are made of durable polypropylene material to guarantee strength and long-lasting performance. They are designed with a rugged textured surface to enhance your vehicle’s style and overall appeal. What’s more, these fender flares can be painted, so you can give your truck a more customized look.
Simple Installation. Setting up these fender flares can be very simple especially when you are equipped with light to moderate mechanical skills. Using a few basic hand tools, you can easily mount each piece to your truck’s factory location points. However, to ensure a secure installation, it may require some minor drilling.
Warranty. There is a 1-year warranty on this product.
Application. These Textured Fender Flares are engineered to fit 2009-2018 RAM 1500 models excluding R/T and Rebel.
Shop All Truck Parts And Accessories
Shop All Truck Exterior Accessories
Shop All Truck Fender Flares
CA Residents:  WARNING: Cancer and Reproductive Harm - www.P65Warnings.ca.gov
Installation Info
Installation Time
(approx) 1 Hour
Difficulty Level:
Simple installation for anyone.
Installation Guides
No guide available for this part yet.
What's in the Box
Review Summary


Installation Time: Afternoon
Mar 22, 2023

Easy install
The weather strips don't stick very well. And the holes don't line up. But ready install. Just took some time having to manually install each but and bolt
May 19, 2022
Ram 1500 Fender Flares
Very nice product, they fit right there without doing any modification.
Apr 17, 2022
Good luck with the gaskets
The gasket is trash the very small 3m tape rolls up when you try to install it on the flares and will NOT stick to the flares i even tried using super glue and still couldn't get the gasket to stay after 3 hrs of trying i got fed up and threw the gaskets in the trash where they belong others have stated the same problem i will use black outdoor caulking to seal the flares
Jul 4, 2021
Not bad for the price.
Makes the truck look meaner and provides coverage for larger tires. I would have given them 5 stars except for a few problems that were encountered. First is the rubber strip is a pain to put on and not as good as would be expected. One of the front flares was 3/8 inch shorter trimmed than the other which made a gap against the fender, this was corrected by slotting the mounting hole and pressing it tighter against the fender. I reused the factory mounting screws as the held the flares better than the supplied screws. I didn't want to remove the HEMI badges so I trimmed out and area to accommodate them . Took about two hours to install, fairly simple and straight forward.
Jun 3, 2021
Flares
The adhesive tape gave me a bit of issues at first but besides that it was pretty quick and easy to install.
Feb 23, 2021
Flare install 2018 Ram Big Horn
I couldn't be happier with these. The quality and price where incredible. They really add some style to the truck.
Feb 7, 2021
Ram 1500 Fender Flares
Fairly easy install. Look nice. I would get them again.
Feb 6, 2021
fender flares
great price easy install only took less then 1 hour and the look great on the truck
Jan 21, 2021
Easy install
They look great and are high quality. Very durable and rugged design
Oct 30, 2020
Fender flares
Love these flares, perfect fit and easy to install!