Guaranteed Free Delivery by 12/24! available on most items - Details
How to Install Putco Flaming Inferno Stainless Steel Upper Overlay Grille - Polished (07-13 Sierra 1500) on your GMC Sierra

Shop Parts in this Guide
PLEASE READ ALL INSTRUCTIONS BEFORE INSTALLATION AND TO CHECK TO SEE THAT ALL PARTS ARE INCLUDED.
Please consult your Vehicles owners manual for vehicle air flow restrictions Putco is not liable for any vehicle damage resulting from the installation of our Grille inserts
NOTE: If you have a no logo grille, you must remove the logo insert from the factory grille prior to installation.
NOTE: Due to the manufacturing process the grille may have a curvature that is the opposite of the factory grille. Once the grille insert is installed on the vehicle it will conform to the factory grille.
NOTE: On the 94-98 GMC Sierra/ 94-99 GMC Suburban&Yukon you can cut the remaining portion of the logo so that it is flush with the rest of the grille (THIS IS OPTIONAL).
Step 1: You will need to be able to reach behind the grille. On most applications remove the factory plastic hood that covers the area between the grille and radiator by removing the plastic plugs or screws that fasten it in place. For the Ford Super Duty remove the screws along the top of the grille and tip the grill forward. On Dodge Ram you only need to open the hood
Step 2: Remove the bolts mounting plates and 3/32” allen wrench from the bag kit.
Step 3: Place the insert over the grille making sure that it is centered on the vehicle.
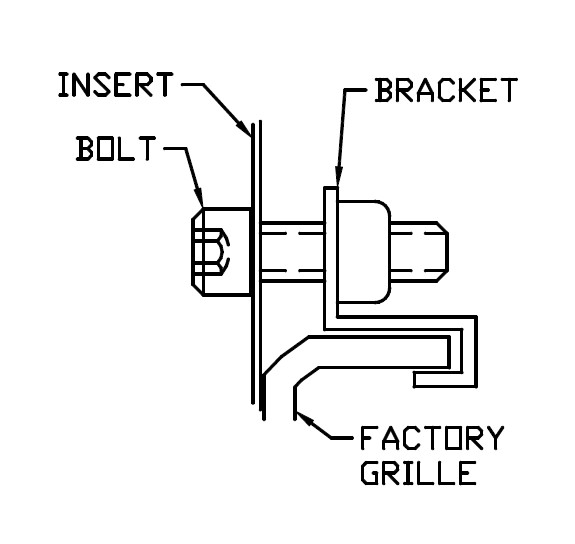
Step 4: Place a bolt through the mounting holes that are pre cut in the insert, place the bracket on the back so that it attaches to the grille. Finger tighten only
Step 5: Check to make sure the grille is properly in place and tighten the bolts with the 3/32” allen wrench just enough to hold the grille in place. DO NOT OVER TIGHTEN as this may cause the grille to crack.
Step 6: Reinstall the hood cover and/or screws and close the hood
Note: The bracket in the diagram may be different from the actual mounting hardware.
