 2019-2025
 2009-2018
 2002-2008


Installation Time
(approx) 1 Hour
Difficulty Level:
Simple installation for anyone.
Installation Guides
No guide available for this part yet.
 FREE 1 to 3-Day Delivery on Orders $119+ Details
Add Details


Change Vehicle Color In Photo
Select Your Color
 172 Reviews
5 Answers
172 Reviews
5 Answers
$329.99 each
Save with Open Box
From $197.99
Will this fit your Vehicle?
Saved - View your saved items
We're sorry. We couldn't save this product at this time.
or use
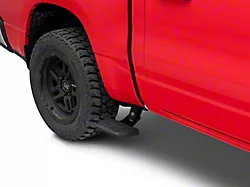
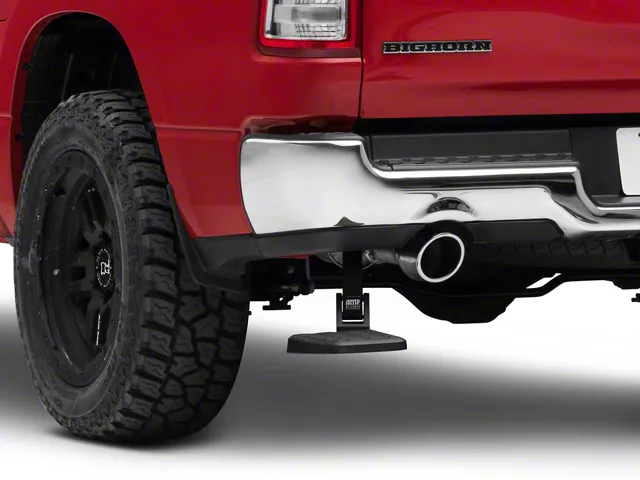
Hey guys, Adam here with americantrucks.com. And today, we're taking a quick look at and installing the Amp Research BedStep, available for the 2019 and newer RAM 1500. Very simply put, you could be checking this out if you're looking for easy access to some smaller cargo items located in your bed, more specifically, something a little bit closer to your tailgate without having to actually drop the tailgate or step up significantly higher onto the very small stepping pad on your factory rear bumper. Now that factory bumper, it's nice that it has the foot grip, it's got the little raised edges, so it's slip-resistant, but this pad here in the corner, especially when the tailgate is open is super small. It's about 3 inches wide. It's not that significant. It makes it a little bit harder to use, especially if your truck is lifted and you're a shorter guy like me. It's tough to get your foot up on there to get some good leverage to get up into the truck and grab cargo.This Amp Research bedstep installs right to the frame over your driver-side tailpipe, and it's gonna give you an easy foot-operated stepping pad that can drop down easily and support up to 300 pounds of weight. Now, this guy here, like I said, being foot-operated, I'm just gonna use my hand for quick demonstration purposes, pops right up, and then you can use your foot to bring it back down. And when it tucks back up, it's pretty nondescript. I mean, you can see it from the back in the side profile, but it really does blend in and it's pretty flush with the bumper itself leaving just a small gap so it doesn't have contact and cause damage over time. So there's enough space around it to make sure it doesn't cause any damage, but enough space there obviously to put your foot down and get it into its down position. Now, this guy uses an 8 by 6 stepping pad, as opposed to maybe the 3 by 4-inch stepping pad on the factory bumper, significantly bigger.The actual stepping pad itself is made from a nice resin material, it's a hard plastic, and it's got those raised grooves there to make sure it gives you that good slip-resistant pad. Because it's plastic, it can't rust out. Over time, it can last through all climate. Now, the actual bracket system itself uses a stainless steel reinforced pivot joint there on the stainless steel bracketing system that also has self-lubricating bushings. So you don't have to do any lubrication maintenance over time. It's got the Amp Research little logo there so you have some brand recognition. And then when you pop it up, no logo's visible, tucks up nicely, and again, comes right back down. Now, you might be thinking you can just easily pick up a hitch step that installs a whole lot quicker and is just as easy to use. Well, that may be true, but if your truck did, number one, not come with a factory hitch and you don't want to pick one up from the aftermarket world or number two, if your hitch that you already have is being used, then you don't have the ability to attach a hitch mount step.This one's perfect because it leaves that hitch-free for use of a hitch, you know, for what its intended purpose is. And it's also great for guys who don't want to spend the money on a hitch itself just to get a bedstep. So, really easy to install right on the frame. And again, because it tucks up so nondescript, it's not in the way of anything either. Now, this guy's gonna run you right around 300 bucks. The install is gonna get one out of three wrenches on our difficulty meter. Again, making it an easy install for anybody to do in the driveway at home. All you have to do is assemble a couple of pieces on a table, then crawl up underneath and bolt it to the frame, and then your stepping pad bolts to it once it's in place. Easy-peasy, take you about an hour from start to finish, if that. I'm gonna walk you through the entire process. What do you say we get started?Tools used in the install include an impact gun, a couple of different size extensions, 13-millimeter, 15-millimeter, 16-millimeter, and 22-millimeter deep sockets, T25 Torx bit, 13-millimeter, 15-millimeter, and 22-millimeter wrenches. First step here, we're gonna take two of our brackets and install them together. Now, you wanna make sure you're installing them correctly because they can overlap different ways and only one of them is gonna be correct. So you wanna take the one that has three holes on the end and the one that has two holes on the end, and put them together. The one with the three holes, this larger one in the middle is gonna overlap the tabs on the other one. So it's gonna go just like that. You wanna have the larger hole here with the flap on top. Once you have that guy taken care of, you're gonna take the 13-millimeter bolts, put one through the front up there like that. You're gonna have to go underneath, a little bit tricky, and thread on the nut by hand. I'm just gonna thread that in as much as I can by hand just to make life a little bit easier. So I'm holding the nut from the inside and I'm twisting on from the top just to get it nice and hand-tight, still making sure that these holes are lined up top and bottom. Flip her over, do the same thing to the top.All right. Again, before you tighten these down with your socket and wrench, you wanna make sure that all the holes are lined up. So these two guys you want lined up. You wanna make sure these guys are lined up as well. All right. Looking pretty good. Let's grab our 13 wrench and 13 socket and tighten those down. All right. A little tricky, but you're gonna go in from this open end here, put a wrench on the nut, grab your impact gun, tighten down the top. Same thing to the other side. Next, we're gonna take basically the step assembly that pops this guy down, just like that. But we're gonna keep it folded up. Put it on the table here, just like this. Now, this guy is gonna install to the top of that but angled off. So these two holes will line up to the top of that. Now, those are threaded. So we're just gonna pop this on and drop down the bolt. And I'm gonna start threading by hand. All right. So I've got that one started. I'm gonna take another one, pop that guy on as well.All right. Now, this is gonna be a little bit more difficult to tighten down. I can use an impact gun on this guy because it's open, but this one's blocked, so we'll have to grab a wrench. Grab your 15 socket and we can tighten down the front one. All right. For this next one, I'm gonna switch over to a ratcheting wrench just to make life a little easier since it is tucked in. All right. Next up, we are underneath of our truck looking at our driver-side tailpipe tip. Above the tip, there are two nuts on the studs built into sort of the frame here. Now there's one here, one there. They're 16 millimeters. So grab your impact gun, your deep socket, get those two off. All right. Now the bracket we just assembled on the table is gonna go right over the studs and those factory nuts are going right back on. So we're gonna feed this whole assembly right over that tip there, pop them onto those studs. Just like that. Take the nut, put it back on the stud. I know the top one is difficult to see, but you're doing the same exact thing at the top.All right. You gotta put your hand over top of the bracket to get the top one on. Now, to tighten them down, you're gonna use the same socket. There's a little opening here to give you access to it. You may need an extension but tighten those two down. Same thing at the top. All right. Now we're gonna install our support bracket that's gonna go to the larger open hole in the frame here and to the side of the bracket we just installed. I'm gonna put a bolt through the inside of the frame there. This might be a little bit difficult to see but you're just gonna bring the nut up that's included in the kit, the larger 22 millimeters, and thread that guy on by hand. All right. We're not gonna tighten that down just yet. Let's put the bolt through the other side as well. All right. Now that's a smaller one, it's a 13-millimeter. Put that through and you're gonna have to go underneath to get the nut in place. Pretty tight spaces here. All right. So, once you get it up there by hand, I'm gonna thread that 13-millimeter all the way down with just my hand. Let's tighten down the 13 first and then we'll do the 22. Grab your 13 wrench to hold the nut. Switch over to the 22 ratchet and socket and tighten down the bigger one.All right. Next, I'm gonna take my step, I'm gonna drop it on. It kind of locks into place there. Then there's three T25 Torx screws that you're gonna install from the bottom up. All right. So, I'm gonna start here on the end. Put it up through. You wanna be careful not to strip this guy out. Put it in there. Hold on the step so it doesn't push up and tighten this guy up. Repeat that for all three. All right. From there, you're good to go.That's gonna wrap up my review and install for the Amp Research BedStep, available for the '19 and newer RAM 1500. You can get yours right here at americantrucks.com.
View Full TranscriptNow Playing

2019-2021 RAM 1500 Amp Research BedStep Review & Install
9:41
Subscribe: New Ram 1500 videos daily!
Subscribe to our YouTube Channel
Features, Description, Reviews, Q&A, Specs & Installation
Shop All Truck Parts And Accessories
Shop All Truck Bed Steps
Shop All Truck Exterior Accessories
Amp Research 75322-01A
CA Residents:  WARNING: Cancer and Reproductive Harm - www.P65Warnings.ca.gov
Installation Info
Installation Time
(approx) 1 Hour
Difficulty Level:
Simple installation for anyone.
Installation Guides
No guide available for this part yet.
What's in the Box