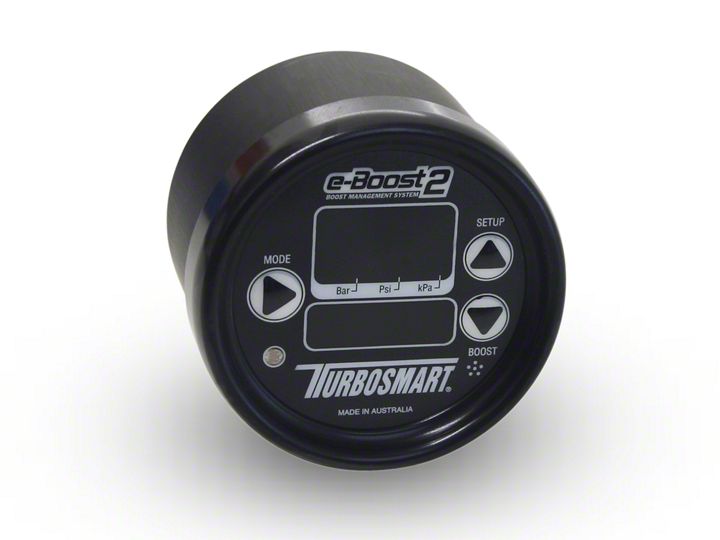
How to Install Turbosmart e-Boost2 Boost Controller - 66mm - Black (97-18 All) on your Ford F-150
Shop Parts in this Guide
Once you have your e-Boost2 installed, you’ll want to set it up. Follow these four
simple steps:
BEFORE YOU BEGIN - Navigating Menus:
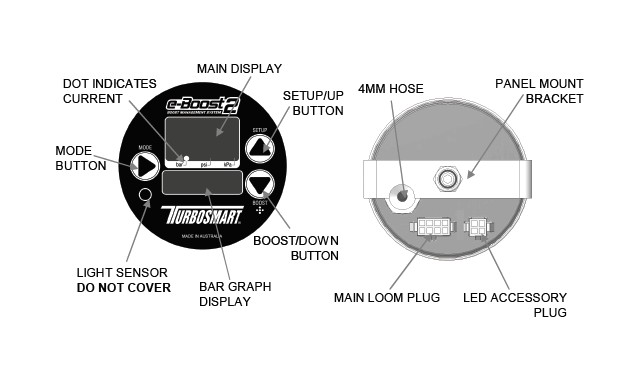
Before you begin, familiarise yourself with the e-Boost2’s buttons and menu system on
the back of this guide.
Step One: Set your OBS: Over Boost Shut Down (obS)
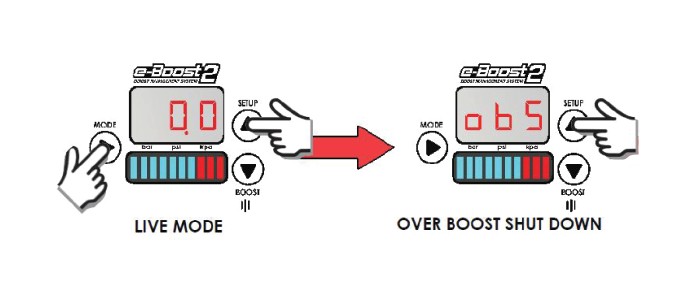
Safety First: This is the limit you will need to set at which your e-Boost2 will cut boost
for safety reasons. THIS MUST BE SET UP FIRST OR YOUR ENGINE WILL NOT
PRODUCE ANY BOOST.
When your e-Boost2 is powered up, it will automatically go into LIVE MODE where
several values can be read in real-time. To enter the SETUP menu hold both the
MODE and SETUP(UP) buttons until you hear beep. Now you are in the SETUP
menu. When you see obS on the screen, press MODE to enter that setting. Set the
obS at 3 PSI above your maximum target boost, and press MODE to exit. Exit the
SETUP menu by pressing and holding MODE until you hear a beep and see the
screen flash.
Step Two: Get a base line. Do not adjust anything yet!
Making no other adjustments to your e-Boost2, perform a base run (we recommend a
dyno for safety reasons) and monitor your boost level. What boost are you achieving?
This is the effective base line, generally this will be the base spring pressure in your
wastegate or actuator. If the boost is considerably higher or lower than your base
spring pressure (by more than 1 or 2 psi) then you may need to check your setup
(Refer full instruction manual).
Step Three: Set Point 1 (SP1)

Enter the BOOST menu by holding both the MODE and BOOST(DOWN) buttons
until you hear beep. Press MODE to enter Boost Group 1 (bG1), press UP until you
see SP1. Press MODE to enter this setting. Adjust the SP1 value using the up and
down buttons - making small increases to this value (Start with increments of 10) –
This is not a psi value, it is the duty cycle of the boost control solenoid. A low value
will achieve boost closer to your base line, whereas a higher number will achieve
closer to your maximum achievable boost. After each increase, do a test run. You do
not need to exit from the SP1 menu, the e-Boost2 automatically shows how much
boost is being produced when it sees positive pressure. Once you are achieving your
desired boost, save the value by pressing MODE, and proceed to the next step.
Step Four: Gate Pressure (GP1)
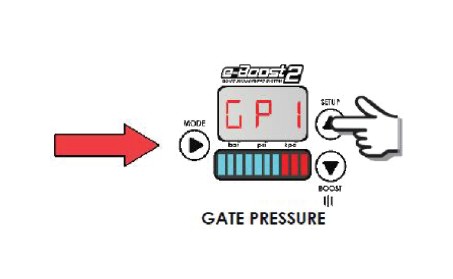
Press UP until you see the Gate Pressure GP1 setting. Press MODE to enter this
setting. For the best possible boost response, now increase the gate pressure – We
recommend increasing this 2-3 psi at a time until you are happy with the response
when testing. Generally a gate pressure 3-4 psi lower than your target pressure
achieves the best response. If a boost spike occurs, you will need to reduce the gate
pressure. Once you are happy with the response, hold MODE to save the value and
press and hold MODE again to exit the SETUP menu.
You have now completed your basic e-boost2 setup! Your e-Boost2 is packed with
features – Refer to the complete User Guide for how to take advantage of the massive
range of features, boost levels and, inputs and outputs.
The following points should be checked if you find that your engine is
over-boosting, under-boosting or the boost pressure is fluctuating erratically.
Please note the following checks will cure 99% of problems experienced when
fitting a Turbosmart e-Boost2.
Check that the e-Boost solenoid is installed correctly.
Ensure the factory boost control solenoid is not connected in the hose between the
pressure source and the waste gate actuator.
Ensure the length of the waste gate actuator rod has not been modified, refer to the
manufactures specifications.
Check to see if the e-Boost solenoid is not blocked or contaminated with dirt, oil build up or debris.
Check the joining hoses for splits, cracks or loose connections and ensure they are not
blocked, kinked or restricted, particularly if the existing hose was reused.
Pressure test the waste gate actuator for leakage, the diaphragm or housing may be
cracked or split.
Ensure the smooth and free operation of the waste gate arm in the turbo exhaust
housing.
Check that the OBS is set higher than the boost pressure you are aiming for.
Check the Blow-off Valve for leakage, some are used as over-boost valves.
Gate pressure maybe set too close to your actual boost pressure.
Use the Solenoid check function to determine whether the solenoid is electrically
connected to the head unit.
Run a vacuum line from the compressor cover (pressure only) to the actuator or bottom
port of the wastegate. Perform a test run to ensure your boost pressure matches the
spring pressure in the unit. If the numbers do not match, there may be a problem with
your wastegate or manifold.
The e-Boost2 is turned on by switching on your ignition.
Turning off the e-Boost2: The e-Boost2 is turned off by pressing and holding the
MODE button for five seconds or turning off your ignition. If you turn the unit off with
you ignition on, pressing the MODE button momentarily will turn the unit back on.
Live Mode: When the e-Boost2 is turned on, it automatically goes into live mode and
displays the current vacuum/boost.
Boost Setup Menu: To enter the boost setup menu, in live mode, press MODE and
BOOST/DOWN butttons ONCE at the same time.
Setup Menu: To enter the setup menu, in live mode, press MODE and SETUP/UP
buttons ONCE at the same time.
Navigation and adjusting values in menus: Use the UP and DOWN buttons to scroll
or adjust values up and down.
Entering menus: Press the MODE buttons ONCE to enter any menu.
Saving settings: When adjusting values, once the desired value is selected, press the
MODE button ONCE to save the value.
Exiting menus: When in any menu, HOLDING the MODE button will bring you back to
the previous menu without saving the setting.
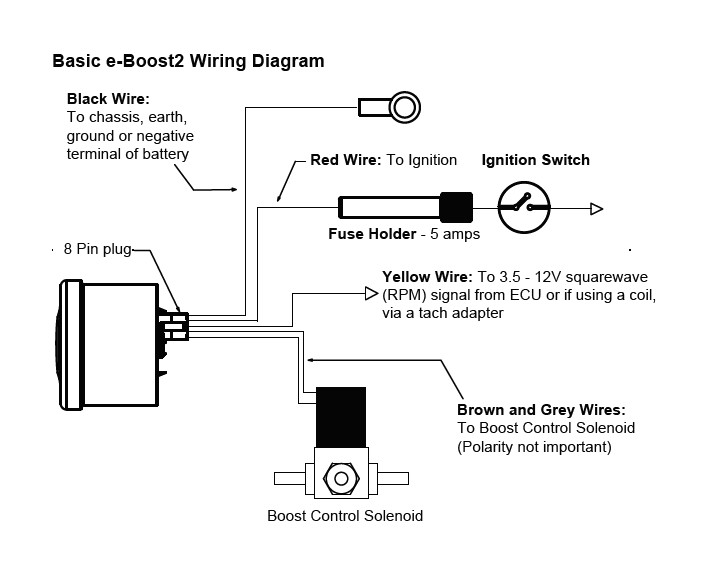
The e-Boost2 must be connected to a 12 volt negative earth electrical system.
All electrical connections must be soldered.
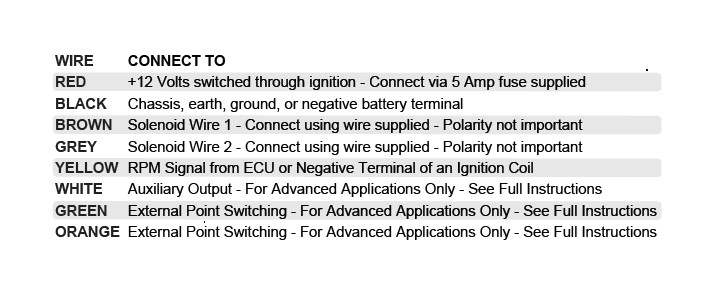
Refer to the following table and diagram for detail on wiring the e-Boost2.
Basic e-Boost2 Wiring Diagram
WARNING! Changing connection methods can cause a higher than expected
increase in boost pressure. Turbosmart recommends resetting your boost controller to
its minimum setting and measuring the base line boost pressure of the new setup,
before increasing your boost again.
Note: If your vehicle is fitted with a factory boost control solenoid, you must disconnect
the hoses that run from the solenoid to the pressure source and from the solenoid to the
wastegate actuator. Leave the solenoid plugged into the wiring loom so that the ECU is
not affected.
Note: Do not re-use factory vacuum hoses. Some factory hoses have a small
restrictor fitted inside them, if the factory hoses are reused over boosting or boost
spiking may occur. Secure all connections with hose clamps.
Note: The e-Boost2 cannot be used to obtain a boost pressure lower than the
wastegate actuator’s mechanical spring pressure setting.
The following are basic connection methods. For more advanced methods, see
the full instructions.
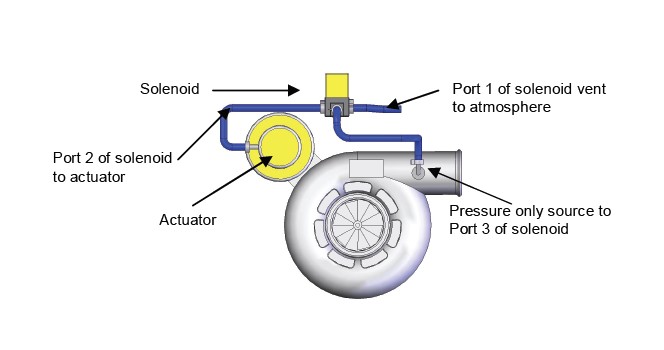
Basic single internal wastegate setup
• Port (1): Vents pressure from the solenoid. Connect this hose to the intake
side of the turbo, between the air cleaner and the inlet of the turbocharger.
Otherwise connect a short piece of the silicon hose and face the vent downwards
to stop water or debris entering the solenoid.
• Port (2): To the internal wastegate actuator
• Port (3): To pressure only source
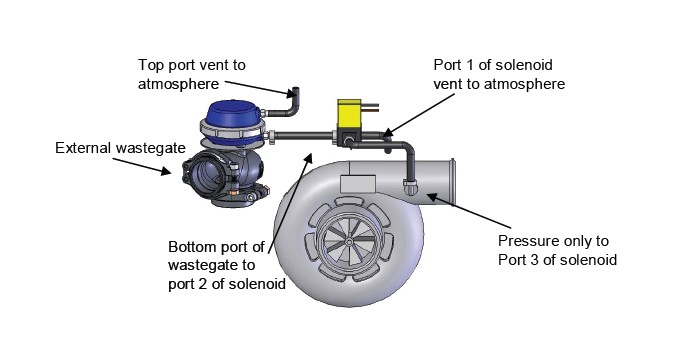
Basic single external wastegate setup
• Port (1): Vents pressure from the solenoid. Connect this hose to the intake
side of the turbo, between the air cleaner and the inlet of the turbocharger.
Otherwise connect a short piece of the silicon hose and face the vent
downwards to stop water or debris entering the solenoid.
• Port (2): To the bottom port of the wastegate
• Port (3): To pressure only source
If you are unable to achieve your desired boost pressure, i.e. boost level is too low, or
not controllable,it is normally due to exhaust manifold backpressure forcing the internal
wastegate to open. To increase your boost pressure further, it is recommended that the
wastegate/actuator spring be changed to a spring which is closer to the desired boost
pressure. Alternately trial a two-port connection method.
For two-port connection method, see the full instruction manual.
A single solenoid can be used to control twin wastegates in a twin-turbo setup. However,
Turbosmart recommends twin solenoids are used in twin-turbo setups to reduce the
length of the pressure hoses to aid in control and response of the wastegates.
For twin solenoid connection methods, see the full instruction manual.
