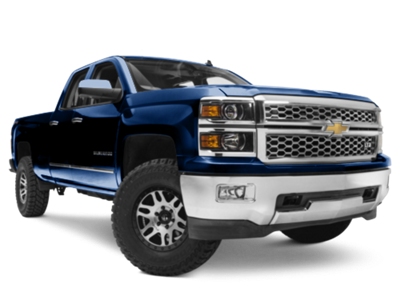
2019-2025
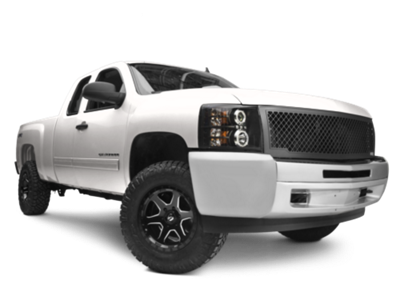
 2014-2018
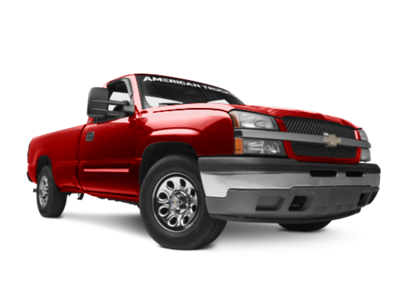
 2007-2013
 1999-2006


Installation Time
(approx) 2 Hours
Difficulty Level:
Simple installation for anyone.
Installation Guides
No guide available for this part yet.
 FREE 1 to 3-Day Delivery on Orders $119+ Details
Add Details


Change Vehicle Color In Photo
Select Your Color
Verify parts fit & get product recommendations
M-F 8:30A-11P, Sat-Sun 8:30A-9P
 43 Reviews
Will this fit your Vehicle?
Saved - View your saved items
We're sorry. We couldn't save this product at this time.
or use
Add Local Installation
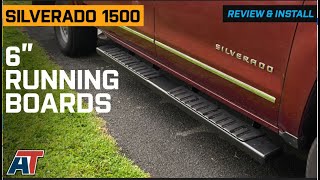
Jake: Jake here for AmericanTrucks, and in this video, we're taking a look at the six-inch Running Boards in black, fitting 2007 to 2018 Silverado 1500 Crew Cabs. If you're looking for some clean, wide, and inexpensive running boards for your own Silverado 1500, this setup is probably going to be just your speed. Now, running boards come in a lot of different flavors, but sometimes simple is best. These boards give you exactly what you need with a really clean design. They feature six-inch width steps, and since they are running boards, they're going to span the full length of the wheelbase. That means you've got a nice wide step that's going to allow you plenty of access to the cabin or bed space or even the roof of your truck should you need it.Now, the top of the step surface features two non-slip pads, one under each door. So you'll have plenty of grip for your shoes no matter how messy it might get outside. Each step is also rated for up to 500 pounds, so they can take whatever you might be able to throw their way, even if you've got two people standing on there loading something up on the roof. But perhaps the most intriguing feature is the overall design. Now, I know I said it's clean and simple, and that's exactly why I'd also call it intriguing. In a world where side steps and Nerf bars can be chunky and aggressive-looking, these are really thin and clean. In fact, from certain angles, you may not even notice them right away. Now I personally really like a subtle side step, and the thin design here means that these are going to give you the step space that you need with a look that won't distract from the other elements of your truck.Now these do sit down a bit and thus will cut into your ground clearance some, but they're not super low. So unless you're doing some heavy-duty trails, you likely won't encounter an issue. And even if you do, these are solid enough to provide your rocker panels with some additional protection, so the bars will take the brunt of the hit instead of your truck. The bars are made from stainless steel, meaning that they're very strong and durable. Finishing that stainless steel off is a black powder coat for good looks and additional protection against rust and corrosion. The tops of the steps feature that ABS plastic step that we mentioned earlier. Of course, you get all the hardware and matching brackets as well for a complete package.But the price might just be the best part. Coming in at about $275, that makes these one of the most affordable options out there in the segment. Now, while you could, of course, spend a lot more on some fancier steps, these have a really solid construction, a clean style, and all of the benefits you want in a running board, and sometimes simple is the best option. Installation is going to get a one out of three on our difficulty meter and the job should take you about two hours to complete. This is a totally bolt-on job, no modifications required so it should go pretty quickly. And here to show you what you've got to do is one of our AT customers.Will: You're going to need a 13-millimeter socket or a 13-millimeter wrench. I prefer using the socket. You need a 14-millimeter socket or a 14-millimeter wrench. It can be closed or open wrench. The 13-millimeter is going to fit on the head of the bolts. The 14-millimeter is going to fit on the nuts. I have my ratchet. Also, I have an impact driver. It's easier to get it tighter, faster whenever you have to detach some of the hardware later on in the process. This is going to make it very quick and easy. I also have, it's not required, but for my particular truck, there is a rubber cap that needs to be popped off so that I can slide the threaded retaining clips into it and a flathead screwdriver comes in handy. Safety glasses, you're just underneath the truck. You get all kinds of dirt and crud underneath there so when you're shaking, things are vibrating, all kinds of dirt and grime and dust stuff can fall so you may want to have safety goggles on.Tape measure, not required, but I use that to center and measure distances to make sure I'm aligning this properly. And then finally, not required, but maybe a foam pad to rest your knees on or a creeper to slide underneath your truck. The hardware that comes with this, you have a threaded retaining clip, you have flat washers, you have bolts, you have locking washers, and then you also have nuts. Keep in mind that the running boards themselves will also have hardware already pre-attached to it that you'll have to remove and then reattach in the appropriate order, but that's also going to have a nut, a flat washer, and a locking washer as well on that particular item.Hi, my name is Will and I'm going to be going over the instructions on how to install your six-inch black running boards to the bottom of an '07 to 2018 Chevy Silverado. So when you receive your brackets, they're going to come in pairs. You're going to get four pairs, but they're really redundant sets. So essentially what it's going to be is two sets of four brackets. Now you want to be careful on these because they actually are different. As you can see, these are inverted, right? So basically the angle of that bracket is mirrored on the other side. Okay. So if you look at your instructions, you're gonna have a loop right here, and then above that, there's gonna be a vacant hole. On this particular model of Silverado, it's not just a loop, it's actually threaded, okay? So what that means is that we're not necessarily gonna use that retaining clips.This is the driver's portion of the rail, and the driver's portion is everything is threaded, okay? When we get back down to the passenger side, and I'll show you, it's not threaded, and of course, we're gonna need all the hardware that came with it. We'll go here. Then what we'll do, now we'll put this bolt. We'll look for its hole which is right there. So we're going to do the exact same thing, but this side. Okay. So keep in mind, remember to save us some grief, we're going to take the bolt, we're going to put the locking washer on it, and then we're going to take the flat washer and put it on top of that. And you can go ahead and do that for both bolts. That way, it's kind of one item. That way you're set. Now keep in mind on the driver's side these were threaded already, so we're not using that additional nut just yet. That's going to be on the passenger side.Take the bracket, make sure the open side is facing out, and then what we can do for here is get this in place and just try and get it finger tight just so the threads start...so they can catch on. And this may be something where it makes sense to just do one...set one bolt down. I'll set it in my driver like this because if I set it in my driver like this, then it's not going anywhere. And then now, I can just apply pressure on it and get it started. Now you don't have to drive it completely down just yet, but we want to make sure that as we're tightening it, we're keeping an eye where the top bolt is gonna go and we want to make sure we're not tightening it down at a weird angle where it's not gonna be able to fit appropriately.All right. So on this one, we're gonna go ahead, pop this one down finger tight. We'll take our driver and since we got it in the right area, I'm going to go ahead and set this one down too. All right, two brackets down. So, for the back half, the passenger end, okay, you've got a loop right here that's not threaded, okay? So this is your bottom eye, and then up here, you've got another eye, okay? And that's what the instructions are referring to, okay? The thing is, you've got a hole, like right here, but your little threaded retaining clip can't fit into it. But what I discovered is there's a rubber or plastic plug to a bigger hole right here, and what you need to do is use a flathead screwdriver to pry that little rubber cap off. When you pry it off, you're not gonna be able to plug it back in because this is gonna be in the way of it fitting. But basically, you're gonna pry it off, and then you'll be able to slide this in so that the threaded end can fit in that smaller hole. That smaller hole aligns with the bottom, okay?Now, the other thing that's different, because we don't have threaded holes here, you have your threaded bracket, right? But you also have, you gotta use that additional nut on this, and I'll make sure I show you that once we get to that step, okay? So, on the back end, because I haven't done that one yet, I'm gonna use a flathead screwdriver to try and pry that little rubber or plastic cap, whatever it is, make sure you don't, you know, directly run this screwdriver like towards your face, you know, things like that. Be careful as you're doing that. You can get a finger under there that helps once you get it started with the screwdriver, okay? So there you go. This popped it off pretty easy. Then you take that retention clip, okay, and see how it sticks out? You're going to stick it underneath behind and then that part that sticks out should be behind your frame, okay? Because your bolt is going to go through right here. All right? So what you can do is push on it.It's got a little spring-loaded clip that's going to keep it in this hole. So what I found was easy is if you go ahead and try and get it started, you can push it with your thumb. Or if you need to, you can use a screwdriver to help kind of pry it and get it to pop in as well. But there you have it. Now, we've got a threaded hole right there, okay? So we'll start with the first bracket. Since I'm on that side, remember, as I noted earlier in the video, I was wrong initially. We want that 90-degree angle, that boxed corner, we want that to be pointing inside. So if you're on the passenger side, one's going to point this way and the next is going to go that way. All right. So what we'll do with this, remember we need to use all of the hardware that we have. So basically... And let's go ahead and get that bolt ready.So the bolt is gonna go first and then according to the instructions, you want the bolt to go up. It's going to go through the bracket. You're going to take the bolt and then you need to slip on a locking washer first. You're gonna take a flat washer after that and stick it on. And keep in mind this creates more surface area, right? So when we put that bracket right here and we're going to put a nut on the back of it. Okay. So I'm going to need to reach and get my ratchet. So remember, I had a 13 and a 14-millimeter socket. The 14 is going to be for whenever you use the bolts. Okay. So we want to make sure that we have our ratchet in the correct orientation and then we can take our driver. We got the bottom one on. Next is going to be...we need the top bolt. This bolt. We have the threaded retaining clip that it's going to go into. So we want to go bolt, locking washer, and then flat washer, in that order, okay? And then this is going to go in the upper...Now, we don't need the 14-millimeter and the ratchet for this because we have the threaded retaining clip, right, so we can start this one and we can get it finger-tight. Okay. Wiggle it a little bit to get it in and we can go ahead and tighten this one down. For the bottom one, we're gonna need the nut, and that's where we'll need the 14-millimeter socket to help hold it tight. If you didn't have a socket, you can definitely use an open or a box wrench. All right. So remember our bolt's gonna go right there. Then you're going to take your nut and try and tighten it on the other side just a little bit so that it can kind of hold everything in place. All right. All right, keep in mind we want to keep this in place where we do the top it's going to fit as well. If we want, we can go ahead and do the top because this isn't really gonna shift on us much. We can go ahead and put the top one in as well.We can get that started and then we can take the driver and go ahead and tighten it in just to keep that nut in place. And we'll go ahead and hit it with our driver. So we got all four in place. We're gonna go ahead and do the other side right now. Okay. Back at it. All right, remember, this is the passenger side and the passenger end. So your right rear portion of your Cab. There's no threaded eyes over here. So we need to remove this plastic plug so that we can put the threaded retention clips in on both of these, okay? So go ahead and do that now. Here, that's one and two. Okay. Next thing we're gonna do is get our threaded tension clamps. I'm gonna stick this one in through the big hole so that it slides and then locks into the smaller hole, right, a little bit down right there. Boom. All right, same thing on this side. And you wiggle it around and it'll sink in. It's got that little spring in it so that it'll hold it in place. So we can take that upper bolt and we can go ahead and just get it in there finger tight. All right. And then now that kind of assists in holding that in place.Now we're going the nut and then that bolt that we already had prepared. We're gonna go ahead and slide it underneath like so. And then that'll help us gauge on, you know, where that upper bolt needs to be. I want to make sure that it's staying somewhat centered on the hook and then on the bottom one, remember we need that socket or that wrench with the 14-millimeter opening on it so we can do that. And then we can take our 13-millimeter on the bottom and go ahead and drive it in. This one we're going to want to do the same thing. Let's go ahead and get our bolts and washers and get them set up. So each bolt gets a locking washer first and then a flat washer after that. And then remember that it's only the bottom bolt that we're going to use the nuts on. And we can wait to do that because it's looking like the best way to do this is get the top bolt in finger-tight and then add the bottom one after that.Okay, finger tight. Take the second bolt and nut. Remember the order is the bolt, locking washer, flat washer and then we're going to go ahead and stick it though. And we're going to take that nut and thread it on the other end. I'm going to do this finger tight as well. Okay. When we do this, we want to make sure that we're pushing our brackets up all the way flush and then we want to make sure it's being pushed out as well. Okay, so we can take our driver and do the top. Suck it down. It's getting a little tight under here. So let's do this. Stick it in from this side. Hold it in place. So now that we're on the driver's side again, keep in mind everything is...has threaded holes already, right? So we will not be using any of the any of the nuts. Remember our brackets. We want the open angle to be away and we want the box 90-degree angle to be towards the inside of our step. Okay. So we go right here, we'll just start threading this just finger tight this one so that we can have it hang and kind of support it.We do the bottom right here. I want to make sure it's going all the way up against the frame and then we also want it flush. Stick the bolt, bottom bolt. We'll stick this in the socket. You don't want to suck it in all the way. We can go ahead and drive that one. We're going to go ahead and slide it under kind of fork, just get it rotated in two or three times just so we can hang it on there. And we'll take the bottom one, put it through the hole, and then we'll start driving it. And I've noticed these bottom ones have been hard to get going and then it dawned on me there's probably a lot of dirt and all kinds of, you know, just crud that gets thrown in these threads and these holes, making them difficult to start the bolt on. So just use a little power behind. Okay, we want to make sure that it's up against the bottom and then we've got it kind of right there. So, again, I'm going to make sure it's flat and go ahead and drive this one in place, once centered.So one thing that is just me thinking ahead is I want to make sure that this running board is somewhat centered underneath the cabin. Okay, so what I'm going to do, I'm going to take the crease of the door. I'm just gonna run my finger back here and I'm gonna make a mark in chalk so that I know where the crease is. You want to take a tape measure and measure this. We've got eight and a half inches between this edge and this edge. So that means it's going to be four and a quarter inches. And I'm just going to make a little chalk mark right there so that I know that it's about lined. All right. So just like that. So when I'm looking at it over there I know that I got it somewhat in place. If you look at the bottom, here's all our hardware that we're going to need. So all of this is going to need to slide down and then fit in these respective holes. Yeah. So if you look at the angle, all of these, they're not perfectly perpendicular to the truck. They dip down a little bit. That's how you know that you have these facing the correct way. So if you were to set it, you can see that it's perfectly parallel to the ground.If you have it around the wrong direction, then it would sit like this. Nobody's gonna be able to step that. So that's kind of a...you just wanna double check, make sure you got everything going the right way. Last thing you wanna do is start assembling something the wrong way. Basically, just keep it organized but I should have eight nuts, eight flat washers, eight locking washers. If you want, you can kind of set them up where they'll need to go. I got to stage them. Next thing we're gonna do is we're gonna try and move this bolts down to where they're gonna align so that we can lay it on top and get the bolts to fall in each of these holes and that way it's gonna stay more or less in place. We'll double-check our chalk line to make sure that we're centered and then once that's the case, we'll just start tightening them down. I would recommend not tightening it super tight right away. Get it finger-tight plus just to kind of keep it steady and do maybe alternating patterns.So maybe the top one on this end, the bottom on this end, bottom on this end, and vice versa, or alternate which one you go through just so you don't have it skewed one direction or the other. All right. Let me see where the chalk is. It's roughly here. Let's try and get these back rows lined up the most. And we can twist it and drop the top one in because it's at an angle we can still maneuver. All right. So it feels like it's in there. So now what we're going to want to do is take a look from the bottom and tighten everything up. Because we want to make sure that we lined up remember that we got that chalk and lining up so let's move it just a hair there. Okay, so we slide it up, flat washer. All right, that way it's not gonna come off, right? Then, going to do the same thing, flat washer, locking washer, and then that nut. And we'll come over here flat washer, locker. Lock wash in in the nut. Lock washer, locking washer. Okay. Flat, lock in.I'm just going to make these finger tight for now and then, truthfully, I'm gonna bring my...I'm gonna use the socket wrench because I think the driver's gonna vibrate the camera. Okay, so now this isn't really going anywhere right so now we can move these around as necessary. Do flat washer, locking washer, right. Next step is going to be doing the driver-side step. We're going to need to remove the nut, the locking washer, and the flat washer. For this, we're going to use the 14-millimeter socket. I'm going to use another driver because that'll speed it up. Remember to get this to line up evenly, I'm going to draw a small line underneath of the door seam with chalk and then I'm going to measure in the middle, find the halfway point so that I can align it whenever I set it. Distance in between is eight and a half inches so I'm going to make a mark at four and one quarter inch. And this line right here lines up with the seam of the doors.Line that up with our chalk. Try not to move it too much. And we're gonna slowly lower it, keeping an eye on these holes. Couple of hairs. So at least this set and this set have fallen in the hole so I can take my hands off and I can get underneath on the creeper to make sure that everything is lining up. What we're gonna wanna do here is reassemble the hardware to each bolt. It's gonna go flat washer and then I got to reach around here and then locking washer and the nut and just attach that pretty tight, well finger tight really. And then I'm gonna do both screws or both bolts rather and then we're just gonna work our way down the line. Flat washer, locking washer, finger tight with the bolt. And then what we're gonna do, I'm gonna come back and we're gonna tighten with the ratchet using the 14-millimeter socket because that's what's gonna tighten the nut. Then go finger tight here and then what we'll want to do to torque it down, we want to do an alternating pattern.So maybe upper on the far end and lower on the distant end over there and then maybe come back and do lower on the next farthest and then upper on the second farthest. So now we've got a top and a bottom and we got all four hit and then we'll come back here and then do the upper on the farthest end. You know just essentially fill in on tightness and then you go back and check every single bolt just to make sure that, you know, it's all snug. You gradually want to do it because if you torque this one down completely and then it's slightly crooked you may get all your bolts tight but they won't be aligned as good as they could be. Flat washer, locking washer, and bolt. Flat washer, locking washer, and bolt. Finger tight. And then I'm just going to make my way down and do the other ones. Washer, locking washer, bolt, finger tight. Flat washer, locking washer, flat, locking washers, bolt, finger tight.All right. So I'm going to take my 14-millimeter socket and I'm going to start on the driver's end. I'm going to go ahead and torque down the upper one. Now I'm going to go all the way back to the last bracket and I'm going to do the bottom one now. Pretty tight, not all my strength. I can reach it... All right. So we've gone high, low, high, low. All right. And then now we need to come back here and do low, high, low, high. But we're going to go low over here, and then high over there and then low or high over here and low over here and alternate. Now we tighten them all finger tight but as you start to snug down some of them, that's going to shift some of these bolts in place. So you may need to give them a few twists with your fingers first just to make it to where you have resistance on your socket to make it go in easier.So they've all got at least a quarter turn on the last bracket. Okay, so now in theory, every one of them are tight, okay, but they're not maybe completely torqued down. So we wanna go ahead and give all of them one more good...see if we can get one more quarter turn out of them. Now we can get them snug. All right, there we go.Jake: That's going to wrap it up here for our review and install of the six-inch Running Boards in Black, fitting 2007 to 2018 Silverado 1500 Crew Cabs. Thanks so much for watching, and as always, for all things Silverado, be sure to keep it right here at americantrucks.com.
View Full TranscriptNow Playing

2007-2018 Silverado 1500 6-Inch Running Boards; Black Review & Install
36:41
Subscribe: New Silverado 1500 videos daily!
Subscribe to our YouTube Channel
Features, Description, Reviews, Q&A, Specs & Installation
| Side Step Finish | Black |
| Side Step Type | Fixed |
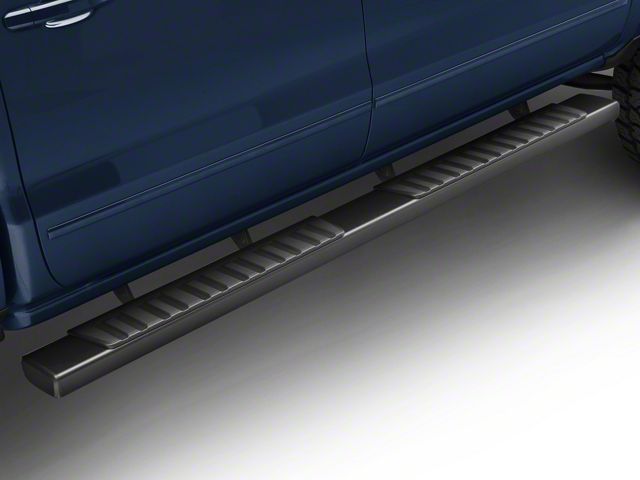
Dependable Stepping Area. At 6-inches wide and with a capacity of five-hundred pounds, our Running Boards provide plenty of extra stability when entering or exiting your vehicle -- especially helpful if you’ve got an extra bulky load. The ABS plastic ensures long term damage-resistance while the slip-resistant step pads keep every passenger safe from sudden falls or slips.
High Strength Quality. Made from stainless steel with black finish, the 6-Inch Running Boards is built to resist rust and corrosion for long-lasting quality.
Simple Installation. The 6-Inch Running Boards bolt on directly to your vehicle using the included mounting brackets.
Application. The 6-Inch Running Boards are structured to be precisely suitable with 2007-2018 Silverado 1500 Crew Cabs.
CA Residents:  WARNING: Cancer and Reproductive Harm - www.P65Warnings.ca.gov
Installation Info
Installation Time
(approx) 2 Hours
Difficulty Level:
Simple installation for anyone.
Installation Guides
No guide available for this part yet.
What's in the Box
Review Summary


Installation Time: Afternoon
Sep 18, 2024
Upgrade
Easy to install looks good feels good supper sturdy would recommend!
Feb 15, 2024

6" running boards
I've only had them for 2 weeks now but I am very happy with them they look just like the ones that Chevy put on my neighbors truck when he bought it Some of the hardware parts that was in the kit wasn't right but I reused some of the old ones and everything was good
Jan 27, 2024
Great Item
Look great.easy to install. Takes less than 2hrs to install.
Jun 27, 2023
Great product for the price
Looks good, seems durable. Easy to install and complete. I'm glad it looks great with the truck.
Jun 6, 2023
Running boards
Decent quality, good fit, install was easy, does the job well
Jan 3, 2025
Side Steps
Bought these all black running boards for my black Sierra to give my truck a more aggressive look. Nice steps, didn't want too much chrome on the truck. These all black steps look great IMO.
Dec 31, 2024
Review shared from 6-Inch Running Boards; Black (19-25 Silverado 1500 Crew Cab)
Excellent Quality!
Easy to install. Great look and great price!! Could not be happier.
Apr 7, 2024
Review shared from 6-Inch Running Boards; Black (19-25 Silverado 1500 Crew Cab)
6 in black running boards
quality product, ease of installation. arrived on time.
Jan 5, 2024
Review shared from 6-Inch Running Boards; Black (19-25 Silverado 1500 Crew Cab)
Sharp looking running boards
Easy to install. Enclosed instructions were very helpful. They look great on my 2020 1500 Silverado.
Apr 25, 2023
Review shared from 6-Inch Running Boards; Stainless Steel (07-18 Silverado 1500 Extended/Double Cab)
Runners
It look very nice. The only thing not enough washer and too small I bought bigger washer and it is more fix