How to Install Putco Black Boss Billet Upper Grille Insert on your F-150
Tools Required
- 10mm, 7/16" Socket and Ratchet
- Pliers
- Needle Nose Pliers
- Flat Blade Screwdriver
- Drill
- 5/16" Drill Bit
- Dremel or Side Cutter
- Marker

Shop Parts in this Guide
Boss Grille Installation
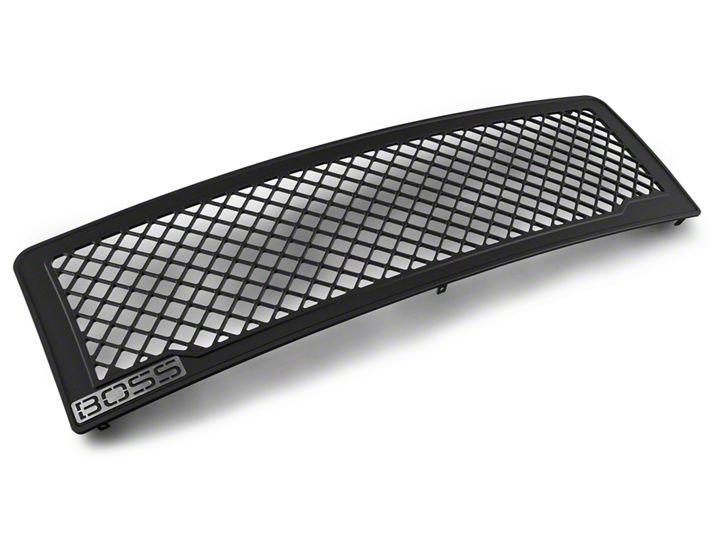
1. Remove grille from packaging. Check to see if all parts from above kit contents table are included.
2. Open hood, Remove six 10mm nuts and two 10mm bolts that secure the grille to the hood and set aside for re-installation.
3. Unclip five retainer clips that are behind the grille near the hood by carefully pulling outward on the top corner of the grille near the hood. This will allow the five retainer clips that secure the grille to the hood to release. CAUTION: Take the proper precautions to protect the face of the grille from cosmetic damage.
4. Reposition factory grille away from the vehicle and place on a clean non- abrasive workbench.
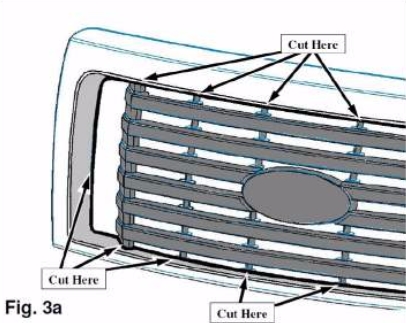
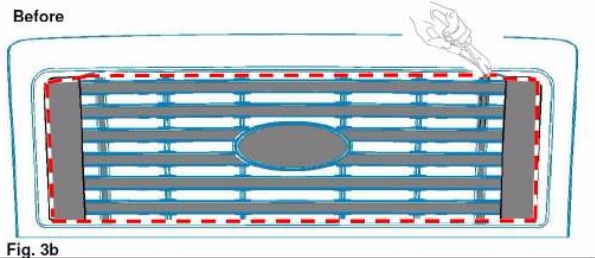
5. Review figure 3a and 3b before cutting your factory grille. You will need to remove the center chrome or painted sections of the factory grille that are shaded gray and outlined in black in figure 3a.
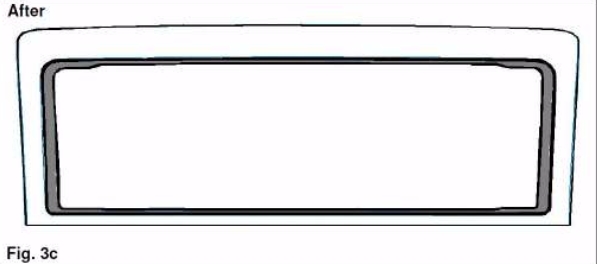
6. Carefully cut out the center section of the factory grille. Use the dashed lines in figure 3b as a guide for cutting. When you have removed the center grille section it should look like figure 3c. (Note: Discard the center section of the factory grille.)


7. Position and align the BOSS Grille inside the factory surround. Mark the mounting locations using the brackets on the back side of the grille with a marker. (Note: Ensure that the grille is centered and aligned before drilling.)
8. Remove BOSS Grille from the factory surround and drill seven holes using a 5/16” drill bit. Use the marks made in Step-8 as a guide for drilling.
9. Insert the BOSS Grille into the factory surround. Align the mounting tabs with the drilled holes.
10. Secure the grille to the factory surround using the hardware provided.
11. Verify that the grille is secure in the factory surround and tighten all of the hardware.
12. Attach the grille to the front of the vehicle by aligning the five retainer clips that attach near the hood and press inwards. (Note: A loud clicking noise is normal.)
13. Verify that the grille retainer clips are fully engaged and that the grille is secure.
14. Re-attach the six 10mm nuts and two 10mm bolts that were removed in Step-2 and tighten down.
15. Confirm that all components and hardware are tight and secure.
16. Close hood. For Lighted grilles, refer to Wiring Installation on Light Bar Installation Instructions for wiring instruction

