Installation Time
(approx) 1 Hour
Difficulty Level:
Simple installation for anyone.
Installation Guides
No guide available for this part yet.
FREE 1 to 3-Day Delivery on Orders $119+ Details
Add Details
Change Vehicle Color In Photo
Select Your Color
Verify parts fit & get product recommendations
M-F 8:30A-11P, Sat-Sun 8:30A-9P
$500.00 pair
Saved - View your saved items
We're sorry. We couldn't save this product at this time.
or use
Add Local Installation
Justin: Hey, everyone. I'm Justin with americantrucks.com. And today, we're taking a closer look at and installing the Morimoto XB LED Tail Lights available for all '09 to '14 F-150s, even including the Raptor. Now, you guys should be checking out the 50-state legal Morimoto tails for your F-150 if you'd like to go with a full LED conversion that will help deliver one of, I think, the most unique looks in the category while still maintaining a factory-styled red lens all backed by a pretty stout 5-year warranty.So when it comes to features, we do have a couple biggies to cover here. First and foremost, if you have factory incandescent tail lights on your truck, which, let's be honest, every 12th gen essentially does, then you are gonna be converting that basic, dull stock tail light to something that's gonna be packing a 100% LED operation. Now, not only will these LEDs just look much brighter and much better overall, but the way they're gonna be implemented here with the Morimoto tail light is really, really cool. Now, for starters, you're getting the diffused LED running light that kind of runs around the perimeter here of the housing. I think that's gonna contribute to a modern look, kind of reminiscent of the '21 and newer F-150s. But if we go even a step further, it's really gonna be the three-dimensional blocks that kind of jump out at you, and I mean that literally.Now, these blocks, both upper and lower here, are gonna be handling things like your turn signals and, of course, your braking duties. And due to the design of those blocks, they do deliver that very cool three-dimensional look. I like it, very unique in the category here, and it certainly stands out. Now, sandwiched in between those blocks will be your LED reverse lights here, again, obviously in the white portion there. A cool feature here to point out that Morimoto tells us about is that if you'd like to use their additional backup booster light bar with these tails, you totally can, and it's a very simple plug-and-play addition. Now, if you don't know what that is, basically the backup boost bar is a license plate-mounted light bar available from Morimoto, separately from the tail lights, of course. But what it does once installed is give you an additional boost of about 2,700 lumens when you back up at night, so obviously it makes things a lot brighter back there. And if you did wanna pair that with these XB tail lights, you can, and it's a very simple plug-and-play install.Now, let's move into construction here. And before we go any further, I do just like to point out that Morimoto tail lights consistently are up there with some of the nicer options in the category from a build standpoint. And the same can be said for the XBs that we have here on the table today. Now, these specific lights are gonna combine a black housing but with a dark red lens. You'll notice it's certainly darker than your factory lights, I feel like, but at the same time, it's not smoked. It's not a gray light. So you are getting still some of that factory flavor, but the fact that it is paired up with that black housing, I think, gives it a more aggressive look at the end of the day. One thing I do want to point out, because of that red lens, this is a DOT and SAE legal light, basically legal for use in all 50 states. And the lights themselves are backed by Morimoto's five-year warranty, just in case you should ever run into any issues.Moving into price point here, guys, and the XBs from Morimoto will live in that low to mid-$500 range, which certainly puts these, I would say, in the upper echelon of F-150 tail lights for this particular generation. Raxiom will also offer a full LED conversion that can be had for a little bit less at the end of the day, but the XBs from Morimoto, I feel, are gonna be very unique in the three-dimensional design of the lights themselves. And, of course, you have to factor in one of the best warranties in the category, all of which does contribute at the end of the day to that higher price point.Last but not least, let's talk installation here. And the site is gonna call this a soft one out of three wrenches on the difficulty meter, taking you an hour at absolute most to complete from start to finish. Now, guys, again, these are gonna be a direct swap plug-and-play job. There is zero additional wiring needed to get everything up and running. So, again, this should be a pretty easy one in the garage or driveway for you. Now, we'll throw it over to an AT customer at home to show you the install process.Man: Well, all right. We are going to be installing the Ford F-150 '09 to 2014 XB LED tail lights by Morimoto. Tools needed, pretty simple. We're going to need an 8-millimeter socket. I'm going to be using it on our little electric ratchet here. That's going to be a 3/8 drive. You could use a 1/4 drive if you absolutely needed to. Not going to be much of a difference there as far as that goes. Here are tail lights assemblies uninstalled. We're going to walk over to the truck. We're going to get started. We are working on a 2012 Ford F-150 Raptor SVT. As you can see, we've got the stock halogen. Assemblies installed at the rear tail lamps, they're dim, they're dingy, they take on moisture at this point, they're old, they're just really not up to date. We're going to drop the tailgate and get started here.My ratchet's going the correct way. We got two 8-millimeter bolts we're going to remove. One is right here as you can see. The other is down below. Go ahead and back those out. We have a couple of push pins, pressure pins. They're going to hold in this tail lamp assembly. Give it a little bit of hold here, hold here, and we're just going to pull towards the back of the vehicle. Just like that. Okay, so for getting these sockets off, you've probably seen it somewhere else. They're pretty simple for the most part. What I do like to do so I don't have my tail lamp assembly jostling around and scratching the body, just undo them. I'm gonna remove them, and then I'm gonna place my tail lamp assembly aside. We're not going to be reusing these sockets and bulb assemblies. The new unit is completely LED.Sometimes it's easier when you're squeezing this pin to push the assembly together, which will release the pin then pull apart. Here we go. Okay. There's what we got so far. We got our two bolts, got our old socket assemblies. We're gonna go over to the driver's side here, and we're gonna do it once again. When you're going back together with this, you may want to run this in by hand and not with one of these guys just because you're using a big coarse screw bolt with a plastic body or housing assembly, could be easy to damage if you're not careful. Again, pop that guy out. Then we do the same thing again. I'm just going to remove these socket assemblies so I can set my tail lamp aside and not worry about it just dangling and scratching everything. Usually, it's going to be... Maybe we've got a 45 or 50-degree turn counterclockwise to undo those guys. And see we got our old assembly sitting there. Now, we're going to take these sockets off.Again, just kind of a little pressure in. Squeeze the release clip and then pull apart. Pretty simple. Good time to check the condition of these connectors too. Just make sure that you don't have any abnormal corrosion building up. Any cleaning or repair that need to be done, now is the time for it. And then our reverse lamp socket assembly. So next step that I'm gonna do for this, being that we have a new assembly going in that has resistors built in to the tail lamp, I'm gonna take this dude, and I'm gonna come underneath here, and I'm gonna run them all out underneath that bottom pocket on both sides. And then if you were interested in the Morimoto, if you've got yourself wrapped or if you're interested in the LED side markers back here, now would be a good time to replace them too, as they are very, very easy to access with this tail lamp out. So, once again, I'm going to take this connector. I'm going to run it under that little bridge on the body bed there. And, now, I've got everything nicely coming out the bottom, okay?So let's go get our tail lamp assembly, and we're going to install. We've got a press pin that goes in here and another press pin that goes in here that's going to be in our new tail lamp assembly. And then we'll install our two screws to finish it up. Okay, here are our new tail lamp assemblies. These are going to be a full LED unit. These things are beautiful. They've got these cool little puck crystal deals in there. I have a feeling these are gonna look amazing. They got the little Morimoto branding there at the bottom showing that they are DOT, excuse me, and SAE-approved, ready to rock and roll for the streets. And then here's our drive side. This drive side does have a slightly different connector or room for another connector. This is going to be for your boost bar. If you choose to get a boost bar, that's some additional light for backing up that I've heard and seen to be pretty amazing. We got our little modules there. We're ready to go.Let's get to the rig. Let's plug it up. Okay, we are now installing our passenger side Morimoto tail light, got a couple smears on there from the water. Sorry about that. We're going to plug these guys in. It does not matter which one goes to which, because you will have two connections that are the same size as you see there, okay? Wanna listen for that click. Make sure these guys are in there all the way nice and tight. Okay, that one clicked, felt it. And then, lastly, this guy right here for our reverse lamp. Okay, nice snap. Now that we've routed this outlet for that socket down, we can politely tuck all these guys in here, including our boost bar wiring, which we'll likely be using later at a different date, installing at a different date. Then we're going to line it up, and we're going to try and get it right in where we need to get it. We've got a top in here. We'll make sure that guy's aligned. That's fragile. Let's be careful with it. Just make sure it's where it needs to be. Get the tail lamp assembly flush to the body, and then we're gonna just go straight back like that. One of the cool things about these Morimotos is they do have a different footprint than the OEM '09 to '14 factory, which is really cool. They are out further in every direction.Okay, once we have our tail lamp assembly slid in, it's now time to get a ratchet. Again, if you don't feel comfortable putting this back in with a ratchet, I definitely recommend just grabbing a little hand tool, little ratchet wrench. I can show you here really quick a couple of different options that could be used. Again, we're running a 3/8 right here, 1/4 inch will do you just fine. So let's get you idea about what we're working with. So it's going to be, again, 8-millimeter socket. And then we can use a nice little ratchet wrench like this. Little safer going in. You know, you're not going to risk really hogging that opening out on the tail lamp assembly, plastic, not risking cracking anything. So we're going to run that in with this guy. Gonna grab our hardware. Now, we've got opening one right here. We're just going to look in, make sure that it's lined up correctly, it's far enough back, it's not too far forward. Okay, nice and tight, not too tight. Again, this is plastic. We don't need to run these guys in like crazy. They're just kind of holding them in place, and our little tension pins are really gonna do the rest of the work. That feels good, okay.So far, I really, really like the fitment. It's got a resemble of a newer aluminum body chassis. I know the 18s stick out a bit, and you've got your blind spot built into those tail lamp assemblies. Does have a really good look. Especially if you're on a regular body and not just the Raptor, you'd really get a really cool-looking build-out on the tail lamp assembly itself. Okay, we're gonna go get the driver side, and then we're gonna install the driver side. It's gonna be the same operation. The only exception, again, would be that if you're running a boost bar from Morimoto, you're gonna be doing it on your passenger side with that connector that we saw earlier, which is that little pigtail that's left over. Okay, let's go get the other tail lamp assembly, the driver side. Okay, here we go. Just being as careful as possible to not scratch and scuff up our paint. Okay, feels good, looks good. Let's gently feed these back in there. There's one of those guide pins we're looking for. Right there, right here, here, here. Okay. Very nice. Really nice fitment on these guys. Two emails [SP]. Opening looks good. Okay. And then our second one down here. I gotta get this lined up. There we go. Okay, there we go. All right. Get our... We'll slip off the tailgate. Let's fire it up. We're gonna check our lights, blinkers, reverse, all that jazz.Justin: Well, there you have it, guys. That will wrap up this review and install of the Morimoto XB LED Tail Lights, available for all '09 to '14 F-150s. As always, keep it right here at americantrucks.com.
View Full TranscriptNow Playing
2009-2014 F-150 Morimoto XB LED Tail Lights; Black Housing Review & Install
17:51
Subscribe: New F150 videos daily!
Subscribe to our YouTube Channel
Features, Description, Reviews, Q&A, Specs & Installation
Brand | Morimoto |
Tail Lights Style | Custom Style |
Tail Light Type | LED |
Tail Light Lens Color | Red |
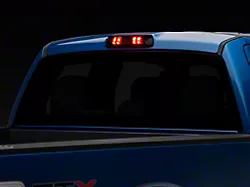
Street Styling. Elevate the look of your ride and signal effectively with this Morimoto XB LED Tail Lights; Black Housing; Red Lens on your F-150. Sporting a plug-and-play wire, it is an easy upgrade to you ride, matching the OEM mounting points of your stock assembly.
Tough Build Quality. Made for lasting service, this assembly is molded from tough composite ensuring optimal durability against weather and road debris. It features a dark ABS plastic case, with a poly lens to protect the bulbs from impact.
Installation. This product is easy to install and should take about 1 hour.
Warranty. There is a limited 5-year warranty on this product.
Application. The Morimoto XB LED Tail Lights; Black Housing; Red Lens fits 2009-2014 F-150 Styleside models.
Fitment:
DetailsMorimoto LF720
CA Residents: WARNING: Cancer and Reproductive Harm - www.P65Warnings.ca.gov
Installation Info
Installation Time
(approx) 1 Hour
Difficulty Level:
Simple installation for anyone.
Installation Guides
No guide available for this part yet.
What's in the Box
Review Summary
Installation Time: Less than 1 Hour
Feb 3, 2025
Brighter lights
The product is very high quality, looks great on my Raptor, and the warranty you will not find on any other lights. Two thumbs up.
Dec 30, 2024
Outstanding fit
Took about 15 each side talk about plug and play. Lots of compliments and jaw dropping.
Jan 29, 2024
Solid product - fit nearly perfect
Everything about the lights are great so far. Only issue is the housing on the outside towards the truck sits a little proud on both sides (seems like it will catch moisture as I drive). I’ve tried to reset them a couple of times but it just seems to be the way they are made.
Jan 16, 2024
Morimoto doesn't fail
Beautiful taillights all around, build quality is impressive, not cheap but it's worth it to get em on a deal (black friday i.e.) only a minor complaint and that is that I would love to have the turn signals be orange, other than that I would recommend spending a little more cash to get these.
Nov 8, 2023
Morimoto XB Tail lights
Good fit, nice look. Only two bolts for each light to unscrew, and the wire harness make for a smooth install.
Jun 2, 2023
Beauty and The Beast
These things emit some absolutely beautiful light.... but they are oversized for a non Raptor F-150. They stick out to the rear and to the side over an inch. From a distance you would never notice. Up close they look kind of ridiculous from certain angles. There is no doubt that these are of extremely high quality. They fit as they should. Install was easy. Price is high but I have no doubt these will last way longer than many of the cheap F-150 taillights out there.
Dec 22, 2023
2012 F-150 FX4
Side note they are not flesh with body compared to the stock lights, but other than that, they are brighter and more aggressive.
Feb 27, 2025
Review shared from Morimoto XB LED Tail Lights; Black Housing; Clear Lens (09-14 F-150 Styleside)
11-14 XB Tail lights
They were packaged very well. Easy install. Be careful releasing the clips on the factory lights ( they become fragile with age ). Lights look great. 100% recommend.
Jun 24, 2024
Review shared from Morimoto XB LED Tail Lights; Black Housing; Clear Lens (09-14 F-150 Styleside)
great tail light but
great tail lights but they sadly don't sit flush my trucks be is not tweaked just a factory defect in all there good lights besides that
Jun 18, 2024
Review shared from Morimoto XB LED Tail Lights; Black Housing; Clear Lens (09-14 F-150 Styleside)
LED Tailights
Love the quality and the look over stock. The warranty also sold me.