2021-2025
 2015-2020
 2009-2014
 2004-2008
 1997-2003


Installation Time
(approx) 2 Hours
Difficulty Level:
Light to Moderate mechanical skill required.
Installation Guides
No guide available for this part yet.
 FREE 1 to 3-Day Delivery on Orders $119+ Details
Add Details

 32 Reviews
$834.99 kit
Will this fit your Vehicle?
Saved - View your saved items
We're sorry. We couldn't save this product at this time.
or use
Add Local Shop Installation
Justin: Hey, what's up, everybody? I'm Justin with americantrucks.com, and today we're taking a closer look at the MBRP Armor Pro Single Exhaust Setup, available for all 2021 and newer 5.0-liter-powered F-150s. Now, this particular MBRP Armor Pro is gonna be a unique option in the category, that essentially delivers two systems in one box. You have the street and the race profile, thanks to the two mid-pipe options that are included with the kit. Now, this kit does include the more traditional-style resonator, shown right here, to help keep that sound down slightly, or it also includes the straight-through pipe here, to increase the volume a little bit. Now, the Armor Pro will feature that premium 304-grade stainless steel throughout, and corresponding lifetime warranty to go along with that, and can be had all for that mid to high $800 price point.All right. As is tradition, let's start off with the sound first, guys, and with the MBRP, again, the big thing to keep in mind here, guys, is the fact that the single-exit Armor Pro does give owners two mid-pipe options in the box, including a traditional resonator, along with the straight pipe, for owners that crave a little bit more volume. Now, because of that, I would say expect two different sound profiles here, depending on which mid-pipe you install. For instance, maybe a strong three out of five on our wake-the-neighbors scale with the resonator in place, and that does get bumped up to I would say a four out of five with the straight pipe in place, on our wake-the-neighbors scale. Also worth noting here, guys, is the fact that the resonator will help keep some of the interior noise down compared to the straight pipe, and this will certainly be my recommendation for F-150 owners who may tow frequently, as the added load that you guys are hauling will certainly introduce a little bit more boominess, especially if you go with the straight pipe instead. But overall, again, the biggest feature I think here, besides the really nice build quality and materials, is the fact that MBRP is kicking in a couple of options, which gives owners some options on how you want the system to sound.Getting into our construction segment, and this particular system, again, the Armor Pro, is gonna be MBRP's top-of-the-line offering, thanks to that full 304-grade stainless steel material throughout. Now, if you didn't know, 304-grade stainless is the pinnacle of materials here, basically, in the land of aftermarket exhaust, and will be the best bet at reducing or preventing corrosion long-term, and because of that, MBRP is gonna back this system with their limited lifetime warranty. Now, moving away from materials let's talk appearance, and this system is gonna give off big-time OE vibes, thanks to that single-exit configuration, that dumps right behind that passenger-side rear tire. Now, if you did crave something to give off more of an aftermarket look, like a dual rear exit, dual side exits, you know, mid-side exit, this system just simply isn't going to be that. Again, this is gonna be for the owners who prefer more of that factory location, but would maybe enjoy a little bit more volume at the end of the day. Piping is all gonna be 3-inch mandrel-bent here, guys, and then everything is going to exit out of your 4-inch slash-cut tip, embossed with the MBRP logo. Finally, MBRP does toss in all of the necessary clamps, and everything needed to make this a relatively painless install, as we'll show you here in a little bit.Now, moving into our pricing, guys, and the Armor Pro from MBRP is gonna set F-150 owners back around 800 to 900 bucks, give or take a bit, which actually does make this to be one of the more affordable 304-grade stainless systems currently on the site, for your '21 and newer truck, and also keep in mind, guys, it's also one of the few to deliver a couple of different sound profiles in one box, so that's definitely worth consideration. Now, with that being said, and with budget in mind, I will say one of the nice things about MBRP is that they do offer a few different systems for different budgets, all with essentially the same sound profile, so if you really dig the sound, but you're not really gonna need that top-of-the-line 304-grade stainless because you live in Arizona or whatever, well then you can even keep things a little bit more budget-friendly by going with the Armor Plus, or even the Armor Lite, both of which will be a bit more affordable than the Armor Pro that we have here.All right. Now let's switch gears, and talk more about the installation, and because you are dealing with essentially a factory configuration, and not a dual-exit system, that will help make the install a bit easier at the end of the day. Either way, figure middle-of-the-road 2 out of 3 wrenches on the difficulty meter, taking you about two hours to complete. But now, to give you a better idea of how this one might go down in the garage or driveway at home, let's throw it out to the shop for our detailed walkthrough and tool breakdown.Man 1: For this install, you will need a metal cutting tool, an angle grinder, a tape measure, a marker, eye and ear protection, various impacts, a swivel adapter, 10, 13, and 15-millimeter sockets, and in our case, a 17-millimeter wrench, a hanger removal tool, and also, not shown here, is a pole jack and an extra set of hands to help you with your factory system.What's up, guys? Today we're gonna be doing an exhaust on our F-150, but before we get started, we're gonna send you to watch a quick video on how to remove your factory system, and we'll see you when you get back.Man 2: Start by grabbing your 13-millimeter socket and undoing the two bolts at the flange. Next, take your exhaust hanger removal tool, and get the muffler out of the isolator. Next, we're gonna slide our exhaust towards the tail end, so we can get them out of the two additional hangers, and then we're gonna drop the whole exhaust as a full. I grabbed a buddy to help me out with that.Man 1: All right, folks. Welcome back. Now that we have our factory system off, there is one thing we need to do before we install our new system. That is going to be to cut our new link pipe down to the appropriate size. Now, this is, depending on the cabin/bed configuration that you have for your truck, ours is a Super Crew, with a 5.5-foot bed, so we're gonna cut it down to 25.25 inches. Now, you wanna refer to your manufacturer instructions to indicate which measurement you need to cut yours down to. So, we've got our tape measure and our marker, and we're gonna mark out 25.25 inches from our slip joint. And you wanna mark this out at a few spots around your pipe. Now, once we have this marked out, we're gonna take ours over to our chop saw, but you can use whatever you have available to you, whether it's a cutting wheel, Sawzall, whatever's gonna cut this tubing best for you.All right. So, now we've come over to our chop saw. We've got our piece locked in, and we've got our blade lined up. Now, I do have shatterproof glasses. You definitely, no matter what you're cutting this with, you wanna wear at least eye protection. Chop saw's pretty loud, so I'm also gonna add ear protection, and we'll get this cut down. Now we'll go take this back to the table, and clean up our burrs on the inside and the outside. All right. So, now we've got our pipe back on our table, and we've got our small angle grinder. We're gonna clean up the outside and the inside. It's very important to do the inside as well, because even though that may not look like much, that can cause turbulence, and we don't want that in our exhaust. We want smooth. So, we'll get this cleaned up.Next, we're gonna need to remove our hanger and isolator brackets from our original exhaust, because we did take those off with it. Actually, a little bit easier that way. So, we're gonna use our hanger removal tool to pop these off. We'll get our middle and rear one as well.So, this kit comes with an option for either a resonated or non-resonated mid-pipe. We're gonna install our resonated section. Now, the process is the exact same whether you're installing the resonator or non-resonated. This kit also comes with a flange that you'll just need to slide over. Looks exactly like this one. And the install process will be the exact same. So, now we'll take our resonated section, slide that up over our crossmember. We also have a pole jack in place [inaudible 00:10:21] hold this. We'll raise this pole jack up a bit. Now, here, you wanna reuse your factory hardware, although we don't have our factory hardware anymore. Got pretty worn out. Slide our bolts through. We're gonna install our nuts on the backside. Your 13-millimeter bolt should just thread back in. Just gonna get these on for now. This resonator's gonna keep it a little more tame. If you wanna go a little louder, install your non-resonated section.Now we can install that link pipe that we cut down. So, we're gonna grab one of our provided slip joint clamps, and get that over our slip joint first. We'll slide this into place, onto our resonator outlet. Make sure that's fully seated. And we're gonna snug this clamp down. We're not gonna fully tighten it just yet. We'll grab our 15-mill socket on our impact. Snug this down. Now we can reinstall our factory hanger and isolator to our frame. So, we're gonna grab our 10-mill bolts. This lined back up. Get those started. We'll come back with our 10-mill socket on our impact, and tighten these down. So, now we're gonna get our hanger clamp in place on our link pipe. Now, this fits onto your slip joint clamp. You're gonna need to pinch that. Get this over the nut. Slide that into place, like so. We want this facing away from the front of the truck. Just slide this on here for now. Let that hang out. Then we can install our muffler section.Now we can get our muffler installed. So, we'll slide our inlet slip joint over our link pipe. We're gonna bring our pole jack over. Gonna help hold this in place. We can bring our hanger clamp over and line that up with our isolator. Also get that over our slip joint on our muffler. You may need to loosen this up a little bit to get it over it. You wanna get that flush with the end of your slip joint. Now, once we have this in position, again, we're gonna just snug this clamp down. We're not gonna fully tighten it just yet. Again, with our 15-mill socket.So, now we can install the muffler outlet and the first portion of our over-axle. So, again, we're gonna grab one of our provided clamps, get that over our slip joint. We can grab our outlet section. We're gonna take that muffler hanger that we removed from our factory setup. Get that onto our hanger. And we'll get this in place. You wanna remember to get that insert on in the hanger. Then we'll reinstall our 10-mill bolt. Now, once we have that started, we'll grab our 10-mill socket and tighten this back down. And just like with the other slip joint clamps, we'll snug this one down.Now we're ready for our tail section, so once again, we're gonna grab a slip joint clamp. So, we'll slide that over the over-axle. We're gonna grab that rear hanger, install that onto our new hanger rod, work that on there. And we'll slide this into position. Make sure our slip joint gets fully seated. We can reinstall the hardware on our hanger. Again, with our 10-mill socket, get this back in place. Also get that top bolt back in. Now we'll get this slip joint clamp in place. And sometimes you might have to loosen these up a hair. Once we get that in position, we'll tighten this one down fully.Now we can install our tip. We'll slide this over our outlet. Now, you do have some room for adjustability, if you want it to be more flush, or if you want it to sit in more, or even out a little bit. We're gonna go pretty flush with our bed side. You want your slash cut to face upwards. So, once we've got that in position, we'll grab an 8-millimeter allen socket and tighten our clamp down. So, now we've got our 8-mill socket, and our tip lined up. Make sure that's tightened down properly, lined up how you want. Now we'll come back and tighten down the rest of our system.So, now we can begin tightening down the rest of our system, and we're gonna start at our flange. Now, once again, your factory hardware should be your 13-millimeter bolts, so you wanna use your 13-mill socket to tighten those up, and ours have been lost to time in many installs, so we've got a 15-millimeter nut, a 17-millimeter bolt. We'll tighten these down. Now, you wanna alternate sides when tightening, to keep this even. Now we can fully tighten down the clamp to our mid-pipe. So, we'll bring back our 15-mill socket. Now we'll tighten down our muffler inlet hanger clamp. Now, lastly, we can tight down our muffler outlet clamp, as we already have our over-axle and tips tightened down.All right, folks. That's gonna wrap up our review and install of our MBRP Armor Pro Single Exhaust System, with Side Exit, for your '21 and newer 5.0-liter F-150, excluding the Tremor. Thanks for watching, and as always, for everything F-150, keep it right here at americantrucks.com.
View Full TranscriptNow Playing

2021-2025 5.0L F-150 MBRP Armor Pro Single Exhaust System Review & Sound Clip
18:15
Subscribe: New F-150 videos daily!
Subscribe to our YouTube Channel
Features, Description, Reviews, Q&A, Specs & Installation
| Brand | MBRP |
| Exhaust System Type | Cat-Back System |
| Exhaust Tip Finish | Chrome, Polished |
| Exhaust Tubing Diameter | 3.00 Inch |
| Exhaust Material | Stainless Steel |
| Exhaust Tip Outlet Style | Single |
| Exhaust Exit Location | Passenger Side - After Tire |
| Exhaust Loudness | Moderate |
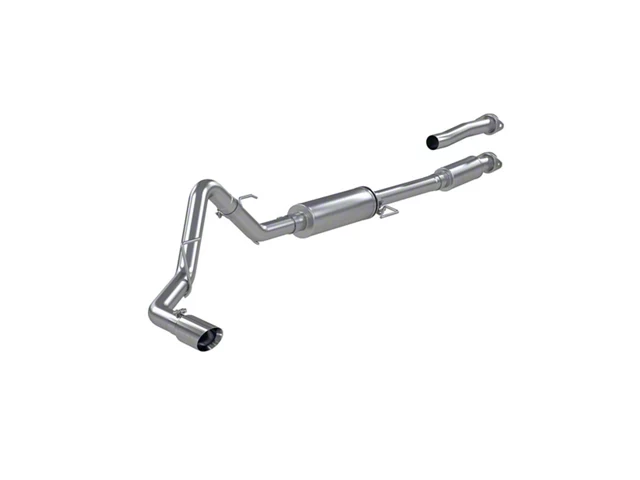
Aggressive, Intimidating Sound. Let your Ford F-150 growl aggressively whenever you drive by upgrading to an MBRP 3-Inch Pro Series Single Exhaust System with Side Exit. This cat-back exhaust transforms your stock-sounding truck into an aggressive beast that will certainly turn heads wherever you go. You’ll definitely feel an added rush of adrenaline whenever you step on the gas.
Improved Power and Performance. The MBRP 3-Inch Pro Series Single Exhaust System lets you unlock the performance of your F-150’s 5.0L engine. The improved airflow from this exhaust upgrade delivers better torque and horsepower numbers. This is perfect when you’re testing the limits of your vehicle on the road or in rough terrain.
Premium Stainless Steel Construction. This MBRP Exhaust System is made from high-quality T304 stainless steel. It is tough, durable, and can withstand all the punishment that your engine will deliver. It has a 3-inch diameter tubing, mandrel-bent to ensure a smoother airflow. Lastly, it comes in a polished finish that includes the side exit tips.
Bolt-On Installation. Installing the MBRP 3-Inch Pro Series Single Exhaust System is fairly straightforward. It is a direct bolt-on replacement and will use stock mounting points without any cutting or further modifications. You can complete this upgrade using basic hand tools and a bit of elbow grease.
Application. The MBRP 3-Inch Pro Series Single Exhaust System with Side Exit fits all 2021-2025 5.0L Ford F-150 models.
MBRP S5211304
CA Residents:  WARNING: Cancer and Reproductive Harm - www.P65Warnings.ca.gov
Installation Info
Installation Time
(approx) 2 Hours
Difficulty Level:
Light to Moderate mechanical skill required.
Installation Guides
No guide available for this part yet.
What's in the Box