Installation Time
(approx) 2 Hours
Difficulty Level:
Light to Moderate mechanical skill required.
Installation Guides
No guide available for this part yet.
FREE 1 to 3-Day Delivery on Orders $119+ Details
Add Details
Verify parts fit & get product recommendations
M-F 8:30A-11P, Sat-Sun 8:30A-9P
$380.00 pair
Saved - View your saved items
We're sorry. We couldn't save this product at this time.
or use
Add Local Installation
Justin: Hey, everybody. I'm Justin with americantrucks.com. And today, we're taking a closer look at and actually installing the Freedom Off-Road Tubular Upper Control Arms, available for all 2004 to 2020 F-150s, equipped with a 2 to 4-inch Front Lift. Now, you should be checking out the Freedom Off-Road options if you'd like to grab one of the more affordable tubular options for your leveled or lifted F-150 to improve things like your ride quality, correct your ball joint angle, and prevent any binding or interference that we might be seeing with your stock upper control arms.So the big feature of the Freedom Off-Road Uppers will be twofold. Now, first and foremost, you are getting a much stronger tubular upper control arm that is designed to work with F-150s that have been leveled or lifted from 2 to 4 inches. Now, they've been designed in a way to correct the angle of the ball joint when installed, and that's going to allow you to correct the overall geometry and still allowing for factory alignment specs. Now, on top of the geometry, the design of the uppers also allows for complete travel of your suspension without any binding or interference, contact by your stock upper control arm to the spring itself, which can and does happen on these aggressive front-end lifts or levels.Now, your construction is also far superior here, guys, to the stamped steel stockers, due largely to the 1-and-a-1/2-inch tubular steel design. Now, that tubular steel is going to house things like your heavy-duty ball joint, of course, here. That's gonna be the star of the show, no doubt. It is pre-greased. It's ready to rock right out of the box. Now, on top of that, you're also gonna get high-performance bushings here on the body side as well as a little bit of gusseting behind the actual ball joint itself.So, should not encounter any deflection or anything like that. Now, if you do eventually wind up killing the upper ball joint here, maybe due to mileage, or aggressive driving, wear and tear, whatever, you can replace the actual ball joint as needed. So always like to point that out. These aren't like a throwaway option. If you kill that ball joint, they're not done. Just replace it and you're good to go. Now, the entire package has been completed in a black powder coat, and both arms, the entire thing, is backed by a one-year limited warranty. Just in case you run into any issues.Now, coming in at or around that mid to low $400 price point, the Freedom options are currently gonna be one of your most affordable on the site when you're looking at a fully welded tubular replacement that isn't like a stock-style replacement. Now, that being said, if you don't need all of this extra beef and you would rather stick with a stock-style replacement, well, you can find a bunch of those here on the site for a heck of a lot less money from companies like OPR.Now, moving into install, guys, keep in mind these are sold in pairs and do feature what I would call a relatively simple bolt-on install, but of course, there is some elbow grease involved to get everything in place. Now, the site's gonna call this a solid two out of three wrenches on the difficulty meter, taking you a couple of hours to complete from start to finish. But what do you say we head out to the shop real quick for our detailed walkthrough and tool breakdown?Man: The tools you'll need for this project are a tape measure, a 1/2-inch impact gun, a 15, a 21, a 22, a 27, and a 30-millimeter socket, a 3/8 and 1/2-inch drive ratchet, an 18 and 21-millimeter wrench, a hammer, 1/2-inch breaker bar, a long pry bar, and possibly a floor jack and a set of jack stands. Hi, everyone, today we're installing a set of upper control arms on our F-150, so let's get started with the uninstall first. Before we actually get the tire removed and get the vehicle lifted up in the air, we're going to want to measure the distance between the center of the wheel and the bottom of the fender here. And the reason for this is because when we put the new control arms back in, we want to make sure that they're back in the same position as what the factory control arms are.So to do that, we're going to go ahead and measure, like I said, between the center of the wheel here to the bottom of the fender. And we've got 26-and-a-1/2 inches right now. So that's where we're going to want it when we put the new control arms back in. So let's go ahead and get our vehicle raised and get our wheel removed. So, now, that we've got our vehicle supported on our lift, which, by the way, you can do this job while the vehicle is on the ground on a set of jack stands and using a floor jack. First thing we're going to want to do after we've got our wheel off and our vehicle supported is disconnect our outer tie rod end from the steering knuckle. To do that, we're going to use our 21-millimeter socket and break that loose.Now, with our nut removed, you may need to use a hammer to dislodge the shaft from the tie rod end from the steering knuckle. To do that, we're just going to wrap a couple of times on the steering knuckle here, and then we'll tap the bottom of the tie rod end. And you see it broke it loose. Now, we can just lift it out and get it out of the way. Now, we'll disconnect the sway bar end link and then our steering knuckle. Now, using our 18-millimeter wrench, we'll go ahead and take this nut off the top of our sway bar end link here. So it'll give us a little bit more movement with our lower control arm to remove our strut. Since our vehicle already has a lift installed on it, our upper control arm is not a factory stock control arm.Now, if you've got a factory stock on yours, you should have a flat steel type of control arm, whereas we've got the tubular on ours. So the process is basically the same, it's just going to look a little bit different. Now, on the stock upper control arm, to release the ball joint, you're just going to take a 21-millimeter socket and remove this nut. Now, you may also have a fitting on the end of the shaft of this ball joint, that's gonna have a 10-millimeter wrench that will fit it. You may or may not need to use that to hold that shaft still when you remove the nut. If you do, then you'll have to use a 10-millimeter wrench and a 21-millimeter socket to remove that nut.So we'll go ahead and remove our cotter pin here, and then take our nut off and get these two separated. So let's go ahead and get that done. So we're gonna use a pair of needle nose pliers to squeeze the end of the cotter pin together so that we can pull it out the other side. And with the cotter pin removed, We'll go ahead and use our socket. Now, we'll go ahead and use our wrench and loosen this nut. And we're not going to take it all the way off just yet because as you can see, there's a gap now between the nut and the steering knuckle, so we need to separate the ball joint from the steering knuckle. And we're going to do that just like what we did with the tie rod end. We're going to use our hammer and tap on the top of the steering knuckle here, and that should free everything up.As you can see, it's now separated. Now, we can go ahead and finish taking off the nut. Now, you can just set that out of the way for right now just so we can access the lower support bolt for our strut and our upper nuts on the top of the strut. Now, with our steering knuckle out of the way, we can go ahead and remove the upper nuts on our strut here. To do that we'll be using our 15-millimeter socket, and then we'll remove the lower strut support bolt below so that we can actually get the strut out of the way. So we'll have access to the two bolts inside here for the control arm itself. So let's go ahead and get these three nuts off the top using our 15-millimeter socket. So our lower strut mount bolt is right here underneath our axle, and there's a 30-millimeter nut here on this side and a 27-millimeter on the other side, and it's right at the very bottom of our strut.Now, at this point, you're going to need a pry bar to get underneath the bottom of the strut here and just kind of pry it up and it'll force the lower control arm down enough to get that lower part of the strut out. Once you get the lower part of the strut out, then the top will just come right down. Now, we'll go ahead and push our control arm out of the way so you can see the bolt. But you see the bolt, one bolt right here and then there's another one on the other side here, and there's a nut on the outside. So we're going to use our socket, our 21-millimeter socket on the inside, and a 21-millimeter wrench on the outside and get this front bolt removed. Now, we'll do the same thing for the rear bolt. Now, we can just pull our control arm straight out.Now, to install our new control arm, we're basically going to reverse the process of what we used to uninstall it. So we're going to go ahead and slide our new control arm in place, and then we'll insert our two bolts that we originally took out. Now, we go ahead and put our original nuts back on the ends. Now, at this point, we're going to go ahead and tighten them up using our 21-millimeter socket and our 21-millimeter wrench. Now, we're not going to tighten this all the way down yet, we're just going to snug it up so that we can go ahead and set the right height like what we measured from before to 23-and-a-1/2 inches. So we're just going to snug this up right now so it'll stay in place. Now, we'll go ahead and reconnect our steering knuckle to our control arm.Now, as you can tell, we've already lowered our vehicle down so that we can check our measurement between the center of the axle here and the bottom of the fender. That's so that we can put our control arm back in the proper position after we get it installed. So we'll go ahead and measure. And right now we're at about 26-and-3/4. So we're about a 1/4 inch too low right now. So what we'll do is we'll go ahead and raise this up the extra 1/4 of an inch, and then tighten down our control arm so that we can go ahead and get our strut installed. So there's our 26-and-a-1/2 inches.We'll tighten our control arm down with our 22-millimeter socket. Double-check our measurement. And we're at 26. Our upper control arm bolts, using our 21-millimeter socket and our 21-millimeter wrench. And then we'll take this apart again so that we can slide our strut back into place. I will go ahead and disconnect our steering knuckle again. That way we can swing it out of the way and go ahead and install our strut. Now, we'll go ahead and lower our jack. All right, now, that we've got our control arm locked into place, we can go ahead and reinstall our strut. Now, this will take a little bit of effort on your part just because of the way that it goes back in. So just make sure that you've got your studs lined up correctly with the holes at the top of the tower. And then we'll just squeeze it in. Then we attach one of the nuts on the top just to hold it in place.Now, we can go ahead and insert the lower end of our strut back into the lower control arm. And for that you will need your pry bar. What we're going to do is we're going to stick this underneath the strut and into the lower control arm, and then just work our way back in so that we can install the lower strut bolt. So underneath the strut on the edge of the lower control arm. Now, we go ahead and install our lower strut mount bolt and attach the nut to the other side. Now, we're ready to go ahead and connect our steering knuckle back to our lower upper control arm. And for this again, you're going to need your pry bar to lift up on that control arm to get it into place.Now, with the ball joint inside your steering knuckle, you may want to use your pry bar just to pull down on it a little bit, give you a little bit extra room for the washer and the nut to grab it. And now we'll go ahead and tighten up our nut. And to tighten our nut, we're going to be using our 22-millimeter socket. And we go ahead and put our other two nuts on the top of our strut, and we'll tighten those down with our 15-millimeter socket. Now, we'll go ahead and reconnect our outer tie rod end. Reattach the original nut and tighten it down with our 21-millimeter socket. And finally, reattach our sway bar, then tighten it down with our 18-millimeter wrench.And, now that we've got the driver's side done, you can repeat that whole process for the other side. And as always, anytime you do any kind of suspension work in the front, make sure that you tighten everything down to factory-recommended torque specifications. And then before you actually try and take it out and drive it, make sure you schedule an alignment to make sure everything is where it needs to be before you take it down the road. And that wraps up our review and install of the Freedom Off-Road Front Upper Control Arms for the 2 to 4-inch Lift for your '04 to '20 F-150, excluding Raptor. Thanks for watching, and remember, for all things F-150, keep it right here at americantrucks.com.
View Full TranscriptNow Playing
2004-2020 F-150 Freedom Offroad Front Upper Control Arms Review & Install
22:37
Subscribe: New F150 videos daily!
Subscribe to our YouTube Channel
Features, Description, Reviews, Q&A, Specs & Installation
Brand | Freedom Offroad |
Control Arms Placement | Front Upper |
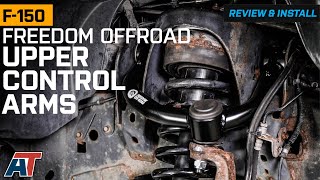
Dependable Functional Design. Looking to take your off-roading to the next level? Freedom Offroad has just what you need with their Front Upper Control Arms. These durable arms are specifically designed for 2”-4” lifted vehicles, so you can take on any terrain with ease. They're made with heavy-duty OE quality materials, and feature 1.5” tubing for added strength and durability. Best of all, they're easy to maintain and will help lessen deflection for a smoother ride.
Warranty. These Freedom Offroad Front Upper Control Arms for 2 to 4-Inch Lift are covered with a 1-year warranty against manufacturing defects.
Application. The Freedom Offroad Front Upper Control Arms for 2 to 4-Inch Lift are constructed to be accurately suitable for 2004-2020 F-150s, excluding Raptors.
Fitment:
Freedom Offroad FO-F704FU
CA Residents: WARNING: Cancer and Reproductive Harm - www.P65Warnings.ca.gov
Installation Info
Installation Time
(approx) 2 Hours
Difficulty Level:
Light to Moderate mechanical skill required.
Installation Guides
No guide available for this part yet.
What's in the Box
Review Summary
Installation Time: Afternoon
Feb 5, 2025
HUGE Improvement for 2 inch Leveled F150
These were definitely a huge improvement over the factory upper control arms. The ball joints are twice the size of factory ones, and install was not horrible, but be prepared to use a lot of different tools and I would not recommend it for beginners. That being said, I had a fairly easy time just taking my time and going through And doing everything. I decided to replace a lot of things on the front end while I was in there. The packaging these came in were not very safe, and I did contact American trucks to let them know that the packaging was very disappointing. I will update this review down the road if anything changes, but so far my truck drives 1000 times better than it did.
Aug 15, 2024
Easy upgrade
2.5 hours to do both sides. Way faster using an impact wrench and a floor jack. 2.5” lift and the stock arms rubbed the springs. The new control arms gained me an inch of clearance. Steering is tighter and the ride is smoother. 100% recommend.
Jul 31, 2024
New upper control arms
Awesome purchase truck feels better then new I’m extremely whit these Control arms
May 30, 2024
Off road control arms
Install meant a lot of disassembly. But went well. Look great. Angle of 2" lift kit fits great. Love ball joints are HD. LOVE THESE.
Feb 12, 2024
Corporate headquarters
Great to be able to get the latest upgrade from American Trucks!
Feb 7, 2024
Rides like a town car
Highly recommend these had a major issue with my control arms these did the trick!!! Perfect now no alignment needed.
Jan 19, 2024
FEELS GREAT!!
I had mixed emotions on this product and honestly it didn't even take long! my dad I knocked it out in about 2 1/2 hours and the end result was good!! it actually lifted my truck like a 1/2 inch makes and feel higher! The ride on them is really good too! Rides really good and on and off road. 10/10 recommend!
Sep 5, 2023
F150
Does not work with 3” spacer. Hit the coils. Would try other options if you have more than 2 1/2” lift
Aug 21, 2023
Great product
Great product, heavy duty. the truck is far more stable going around turns and off roading
Aug 10, 2023
Control Arms
The control arms are resting on my struts. I put a 3 inch spacer on my struts and I ordered these control arms because it says that they are for a 2 to 3 inch lift but they are in fact to short.