Installation Time
(approx) 30 Minutes
Difficulty Level:
Simple installation for anyone.
Installation Guides
No guide available for this part yet.
FREE 1 to 3-Day Delivery on Orders $119+ Details
Add Details
Change Vehicle Color In Photo
Select Your Color
Verify parts fit & get product recommendations
M-F 8:30A-11P, Sat-Sun 8:30A-9P
$114.99 each
Save with Open Box
From $68.99
Saved - View your saved items
We're sorry. We couldn't save this product at this time.
or use
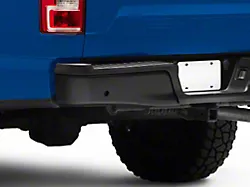
Rear Bumper Cap End; Pre-Drilled for Backup Sensors; Driver Side; Black (15-20 F-150, Excluding Raptor)
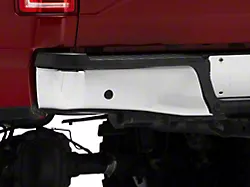
Rear Bumper Cap End; Pre-Drilled for Backup Sensors; Driver Side; Chrome (15-20 F-150, Excluding Raptor)
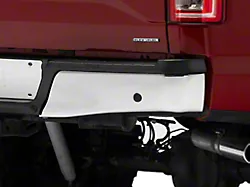
Rear Bumper Cap End; Pre-Drilled for Backup Sensors; Passenger Side; Chrome (15-20 F-150, Excluding Raptor)
Trey: What's up, guys? Trey here with americantrucks.com, and today, we're checking out this Rear Bumper Top Step Pad with Pre-Drilled Backup Sensors, designed to fit the 2015 to 2020 F-150s, but not including the Raptors. This is a great replacement option for F-150 owners needing a new step pad, especially if your truck is equipped with those factory backup sensors.This step pad is designed to restore functionality and appearance of your F-150's rear bumper. It's pre-drilled for those backup sensors, ensuring compatibility with trucks equipped with that feature, while maintaining the factory style, and fit and finish. The textured surface provides slip resistance, offering added safety when stepping onto the bumper, even in wet or muddy conditions. Crafted to match with the OEM specifications, this step pad seamlessly integrates with your factory bumper, for a cohesive and polished look.This rear bumper step pad is made from high-quality durable materials, chosen for strength and resistance to wear. This textured black finish matches your truck's build, and enhances the durability of the step pad, ensuring it won't easily fade or crack over time.As far as the pricing goes on this, it's gonna come in right around that mid $100 price range, making it an affordable solution for restoring the functionality and the aesthetics of your truck's rear bumper.Installing this bumper step pad is a straightforward process, so it earns only a 1 out of 3 wrenches on our difficulty meter, and should only take you about 30 minutes to complete. This is a direct replacement, and all the necessary hardware is gonna be included, so now let's see exactly how this goes on, with an install video from one of our americantrucks.com customers.Man: All right. In order to replace your rear bumper step pad on your F-150, you're gonna need a flathead screwdriver in order to pry out some clips and lights. You need some pliers [inaudible 00:02:12] some clips. [inaudible 00:02:14] gonna need this drill, with a 5/32 size bit. [inaudible 00:02:28] new step pad.All right. So, we are going to be replacing this 2019 F-150's rear bumper step pad. [inaudible 00:02:39] little bit of damage, because the trailer came off the hitch, and got jammed, right there. So, we'll be replacing that.So, first you're gonna wanna go ahead and take off your license plate. I already did that. [inaudible 00:02:57] So, right here, open this up. Get your key. [inaudible 00:03:07] come in, [inaudible 00:03:09] pulls right out. That [inaudible 00:03:11] lock this in place.So next, you're gonna pop these lights out, on both sides, that light up your license plate. Just get a flathead screwdriver, and go in onto the side. Just pry them out a little bit, two clips on each side. All right. Now you're gonna unplug the light from this plug right here. Grab this and push in, and twist to the left, and it pops right out. All right. And do this on both sides. Come over here, pop it out, and then twist. Pops right out. Just gonna put those back in there. Make sure you keep these, because you're gonna use these on your new step pad.So, we're gonna come underneath the truck, and right back here is where it is. You're gonna, there's two clips right here, on each side. The silver clips. You're going to squeeze them in, and just, they push out. All right. And now, you're going to unplug this wire right here.All right. So, we pushed this out, back through here, so we can come through here and show you how you unplug, right here. So, there's this clip, right here. You're gonna push this in, with your thumb. Just pops right out. And you're gonna push that right back through. And save this, because you're also gonna need this.All right. Next step is to take out, or unplug these sensors right here. They're on both sides. [inaudible 00:04:57] gonna come underneath. There's a plug, right here. And there's this clip right here at the end. And you're gonna push in, and you hear that click, once you push it in, and you hear that click, you're gonna slide it right out. All right. And we're gonna leave these in here for now, and we'll take this part out, it's the actual sensor, once we get the rest of the plastic off.All right. So, next step is to pop out all these little clips, right up in here. And they go all along the whole deal. So, you can get some needles, or some pliers. Squeeze them tight. Just push out. Just try to man handle it. Just pop them out. We kinda already got these going a little bit, so they're a little bit easier. But just have to work with them. You can break them off if you need to [inaudible 00:05:48] might not need the step [inaudible 00:05:50] So just go along, start popping them out. Once you've got them all popped out, you can come back out. [inaudible 00:05:59] here. You're just gonna start popping the...pulling up on this plastic. Try to get them all out. And it should just pop right off like that. All right.We're gonna be taking out the sensors, because we're gonna reuse these right here. You're gonna come along to the backside. This right here is where we unplugged them, from before, where we took the whole [inaudible 00:06:30] off. But there are these tabs, right up here on the top, and right up here. They're holding in this. So just lift up on it, and then squeeze them out a little bit. Come around to the backside and push this in. Once you've got these popped out, it just pops right out. Now, there's this little ring, this little rubber ring that might fall off with it. Make sure you keep that. Throw it back on there. You're gonna need to reuse it. The flat side goes up on the top. And then, so, we're gonna do that to the other side. Just come along, pop those out, push through from the other side. Just comes right out. This one, the rubber piece stayed on. Or, sorry. I was wrong, actually. The rubber piece stays on like that. All right. So they should look like this once you pop them out. So now you're gonna get the plastic part. There's this little tab right here, up on the end. Push it in a little bit. Get underneath that plastic, and do this. Pop them right out. All right. Gonna go ahead and place these back in here. Squeeze them in. Just like that. And we're gonna reuse these sensors on the new pad.All right. So, next, we're gonna get the new rear bumper step pad. We're gonna be drilling in the holes for our license plate. And you come around to the back. And we got a 5/32 size drill bit. Could probably just try to get some kind of needle or something to poke a hole through them. It's kind of thin, but just gonna go right through. Just real easy to just pop a little hole for your screws, for your license plate. All right. So, now that we've got the holes drilled out for our license plate, we're gonna come in and line this up. We're gonna be popping these clips in to these little openings right here. So, like I said earlier that, on this truck, [inaudible 00:08:52] was hauling a trailer and the trailer [inaudible 00:08:54] off, and it kind of did some damage to it. So this is a little bent. Yours should be flat. So then, ours won't be able to line up perfect, but we're gonna do the best that we can. So you're just gonna come up through here, and get [inaudible 00:09:11] lined up. All right. And, be easiest to start from the middle. You just start popping those clips in, and lining them up. Feed them through with some pliers or something. Just work along and get each and every one of them popped in. Just like this.All right. So, next, we're gonna be putting the sensors back in here. And once we've got this all [inaudible 00:09:46] and lined up good, [inaudible 00:09:46] pop that sensor out [inaudible 00:09:56] plastic [inaudible 00:09:58] put them back in like I did. You can see the ring [inaudible 00:10:01] goes in this way, with the [inaudible 00:10:03] part up, or down there. And there's this opening right here, where this fits in going that way. All right. So, you're gonna want the opening on both sides to be facing in, towards your hitch. So, on the right side, [inaudible 00:10:16] towards the left. Just pop it in there like that. We'll do the same deal with the other side. Sensor out. Opening is now facing this way. So, towards the right. Pops in just like that. All right.So, now we're gonna go into the bottom. Put the sensor back in to where we just got it out of. Right here. Pop it in just like so. Clip. The one we took it out a second ago. [inaudible 00:11:06] Once you year that click, do the same thing to the other side. Push it all the way in, to where it's flat over here on this other side right... Go in and plug that [inaudible 00:11:23] Hear that click and you're good. All right. Now that we're already down here, we're gonna get the light bulbs from [inaudible 00:11:37] that illuminate your license plate. We're just gonna fit them right back through the hole where they came through. [inaudible 00:11:47] grab it. Now we're ready to put our light bulbs back in. Once again, it's gonna go [inaudible 00:12:00] these clips right here. Just got one clip on this side, and these two clips right here. So, we'll go in and get it up in there. Put it in. Give it a twist to the right. Tighten it in. Good to go. Just pops right in just like that. And on the other side. [inaudible 00:12:27] Twist. Pops right in. Put in our running lamps [inaudible 00:12:41] for the trailer. It goes in [inaudible 00:12:46] plug [inaudible 00:12:47] on top. Just pop right in, just like that.All right. Sorry, my phone died there for a second. So, once you get this pushed in right there, you're gonna come in from the bottom. You got this deal right here. All right. Line it up. Just push it in. [inaudible 00:13:13] little click [inaudible 00:13:15] but you're good to go. All right. So, now you're just gonna go in. And if the key's on unlocked take it out. Opening's facing down. Push it all the way in. And just lock it. All right. And there you have it. Now you're done. Replacing your rear bumper step pad. This is how it should look once it's finished.Trey: All right. That's gonna wrap it up for our review and install of the Rear Bumper Top Step Pad, with Pre-Drilled Holes for the Backup Sensors, on your 2015 to 2020 F-150s, but not including the Raptor. And for all things F-150, keep it right here at americantrucks.com.
View Full TranscriptNow Playing
2015-2020 F-150 Rear Bumper Top Step Pad Review & Install
14:11
Subscribe: New F150 videos daily!
Subscribe to our YouTube Channel
Features, Description, Reviews, Q&A, Specs & Installation
Safer Truck Bed Access. Adding this Rear Bumper Top Step Pad; Pre-Drilled for Backup Sensors will let you safely access your truck bed. This OEM style top step pad provides excellent traction to prevent you from slipping or falling even in wet driving conditions. What’s more, this step pad is made with pre-drilled holes to easily accommodate your vehicle’s backup sensors.
High-Quality Construction. To serve you for several years, this rear bumper top step pad is made of high-quality and durable materials. Even if the step pad is frequently exposed to weather elements and road hazards, it won’t easily crack or break. Furthermore, this step pad comes in black to match your truck’s rugged build.
Easy Installation. Installing this top step pad is quick and easy. With its OEM style, you can directly mount it to your rear bumper’s existing points. No modifications are required.
Application. This Rear Bumper Top Step Pad; Pre-Drilled for Backup Sensors is created to fit 2015-2020 Ford F-150 models, excluding Raptors.
Fitment:
DetailsCA Residents: WARNING: Cancer and Reproductive Harm - www.P65Warnings.ca.gov
Installation Info
Installation Time
(approx) 30 Minutes
Difficulty Level:
Simple installation for anyone.
Installation Guides
No guide available for this part yet.
What's in the Box
Review Summary
Installation Time: Less than 1 Hour
Oct 29, 2024
Rear bumper pad
OK for a replacement, but it's an offset fitting had to really put effort on it, because it is just a little off from the oem. Had two back up sensor holes, but my 2017 doesn't have the back up sensor
Oct 17, 2023
Pretty close to oem but pliers, mallet, 2x4 and patience!!
Not the easiest to install, the plastic inserts of the steps are substantially thicker and requires to squeeze them tight before you can install them onto the bumper. A buddy would make the install easier have patience and use a 2x4 and mallet to simplify the install.
Nov 20, 2022
Easy update
Looks great with the new body colored bumper and the smoked license plate lights
May 29, 2022
Review shared from Rear Bumper Top Step Pad (09-14 F-150 Styleside)
Bamper
Very good and fits good on a f150 ford I have an black ford very good