How to Install Black Horse Off Road Grille Guard - Black (04-08 All) on your Ford F-150
Before Installation
Please read the instruction completely for
Easy installation, which will also help you to avoid scratches or other potential damages to your appealing car.
The information shown here is for reference only and may different from the product that you receive, however the goods are fitted in the same way.
Care and Cleaning
Mild soap may be used also to clean the product.
Please periodically check and retighten all the hardware and clean the investment for a refresh look.
Parts List
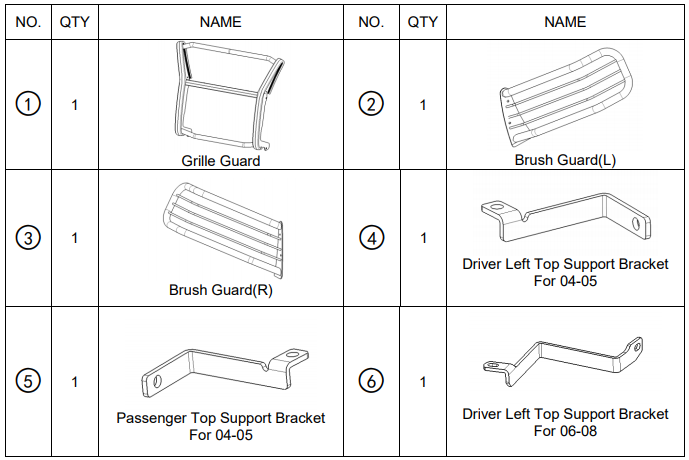
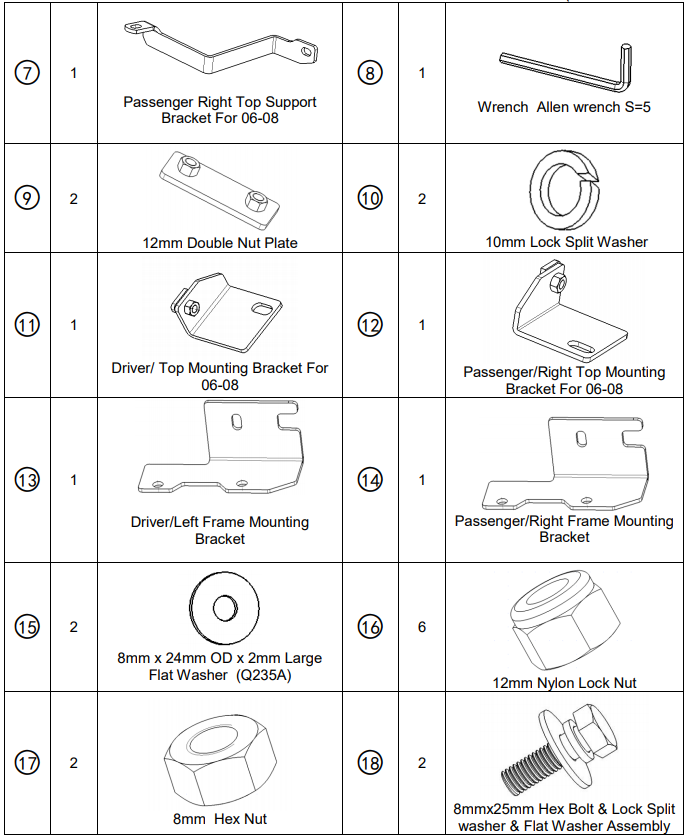
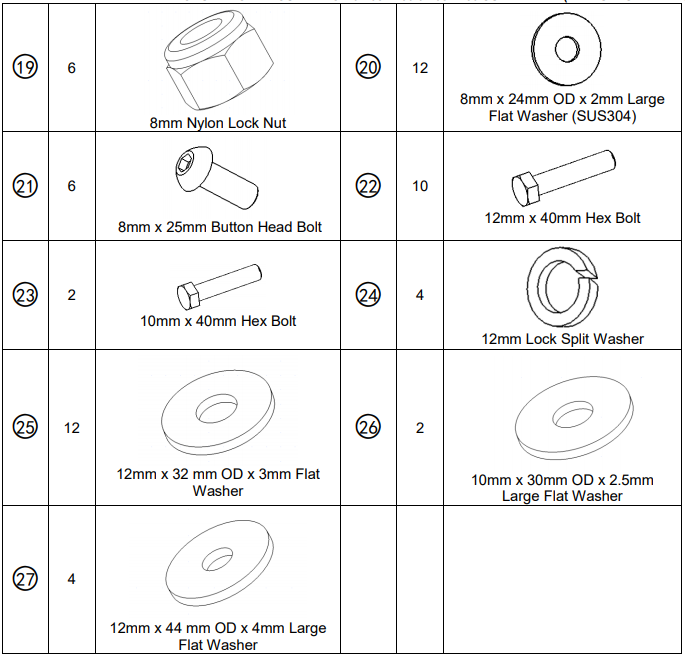
Installation Step
Install left and right brush guard on the grille guard.
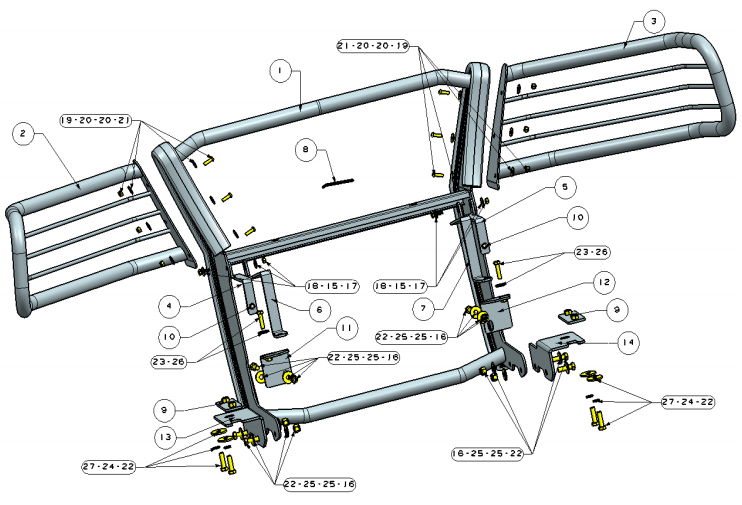
Procedure
REMOVE CONTENTS FROM BOX. VERIFY ALL PARTS ARE PRESENT. READ INSTRUCTIONS CAREFULLY BEFORE STARTING INSTALLATION. CUTTING MAY BE REQUIRED.
1. Determine if the vehicle is equipped with or without factory tow hooks.
Vehicles with factory tow hooks:
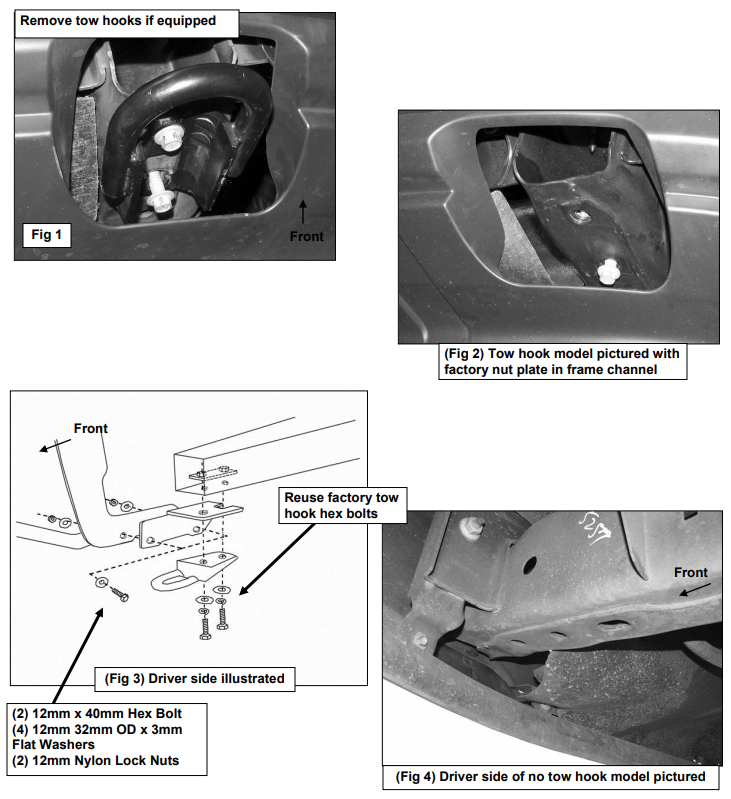
a. Start on the driver side and remove the forward hex bolt in the tow hook. Next, loosen the rear bolt but do not remove, (this will help hold the nut plate in the correct location inside the frame channel-see Figure 2). Slide the tow hook out from under the rear hex bolt. Keep the factory double nut plate in the frame and aligned with the holes.
b. Position the Mounting Bracket up to the bottom of the frame and secure it with the factory tow hook bolts into the factory double nut plate, (Figure 3). NOTE: On some model years, the Grille Guard Brackets may not be compatible with the factory tow hooks. Reinstall the tow hook over the Bracket with the factory hex bolts if there is clearance.
c. Repeat Steps a – b for the passenger side Frame Bracket installation.
Vehicles without Tow Hooks:
a. Remove the lower plastic bumper cover/air dam, (Figure 4).
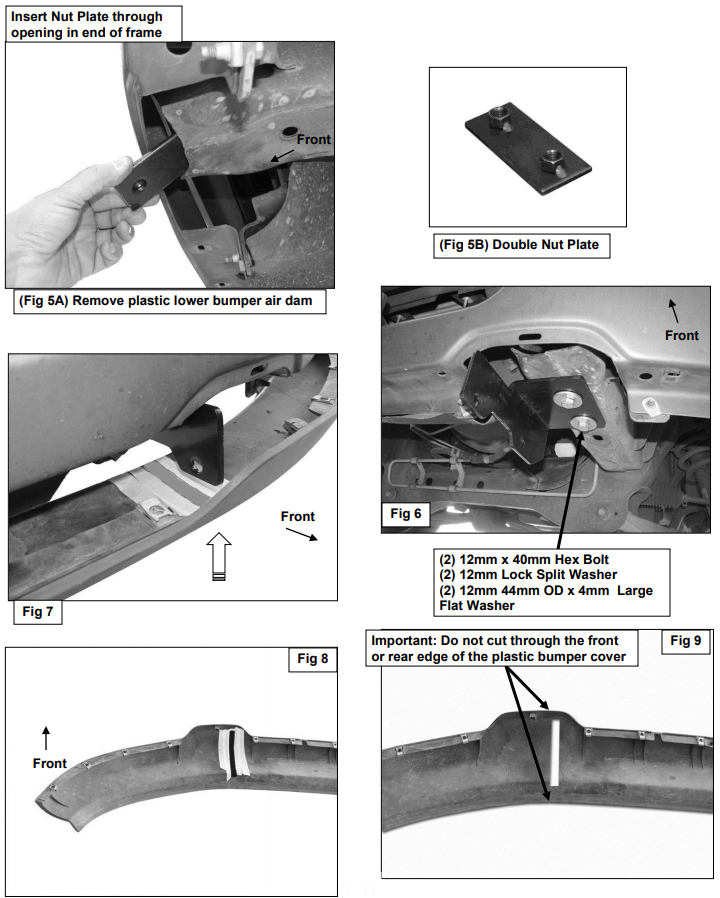
b. Starting on the driver side of the vehicle, insert (1) (number 9) 12mm Double Nut Plate through the opening in the open front end of the frame, (Figures 5A & 5B). Line up the threaded hex nuts on the Nut Plate with the (2) factory holes in the bottom of the frame channel. Hold the Nut Plate in position with (1) (number 22) 12mm x 40mm Hex Bolt, (1) (number 24) 12mm Lock Split Washer and (1) (number 27) 12mm x 44mm Large Flat Washer partially threaded into the rearmost threaded hole in the Nut Plate, (Figure 6).
c. Select the driver side Frame Mounting Bracket. Slide the slot in the Bracket under the 12mm Hex Bolt and Washers. Line up the remaining hole in the Bracket with the forward hole in the Nut Plate. Insert (1) (number 22) 12mm x 40mm Hex Bolt, (1) (number 24) 12mm Lock Split Washer and (1) (number 27) 12mm x 44mm Large Flat Washer into the remaining hole in the Bracket, (Figure 6). Snug but do not fully tighten hardware at this time.
d. Repeat Steps b – c to install the passenger side Frame Bracket.
e. Hold the bumper cover up to the vehicle and mark the location of the (2) Brackets onto the inside of the cover, (Figures 7 & 8). Carefully cut (2) slots through the cover wide enough to clear the (2) Brackets, (Figure 9).
IMPORTANT: Do not cut through the top or bottom edge of the cover. Reinstall the cover with the factory hardware.
2. With help position the Grille Guard onto the inside of the Mounting Brackets. Use the included (4) (number 22) 12mm x 30mm Hex Bolts, (8) (number 27) 12mm x 44mm Large Flat Washer and (4) 12mm Nylon Lock Nuts to attach the Grille Guard to the Mounting Brackets, (Figure 3). Do not tighten at this time.
3. Slowly open the hood and check for clearance. Select the appropriate Top Bracket installation:
04 – 05 model years:
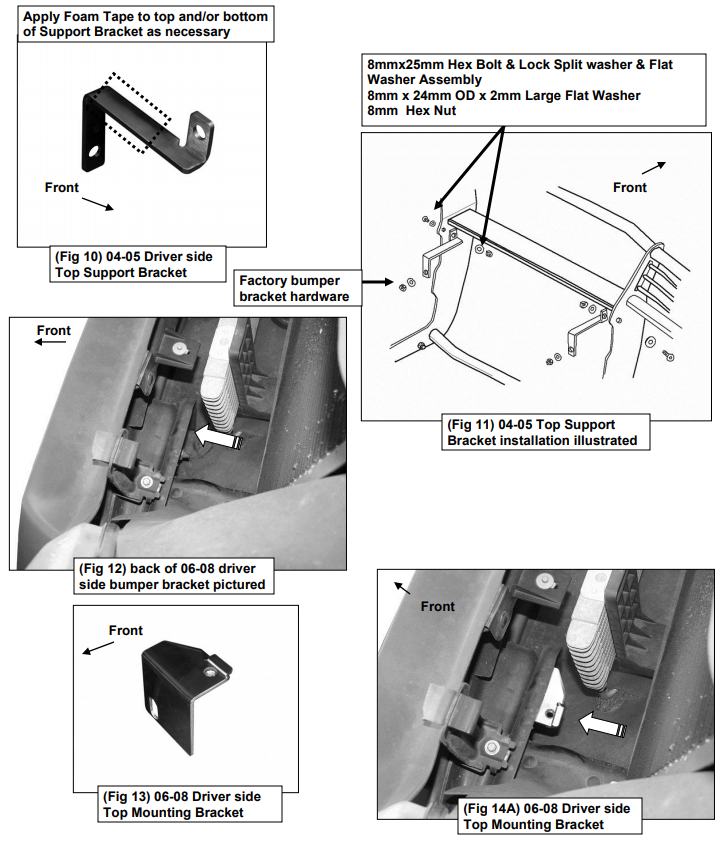
a. Locate and remove the factory nut on the top of the bumper bracket. Select the driver side 04-05 Top Bracket, (Figure 10).
b. Apply a section of the included Adhesive Backed Foam Tape to the Bracket in any location that may come in contact with the bumper or grille, (Figure 10).
c. Attach the Bracket to the bumper bolt with the factory hex nut, (Figure 11). Leave hardware loose at this time. Repeat Steps a – b for passenger side Support Bracket installation.
06 – 08 model years:
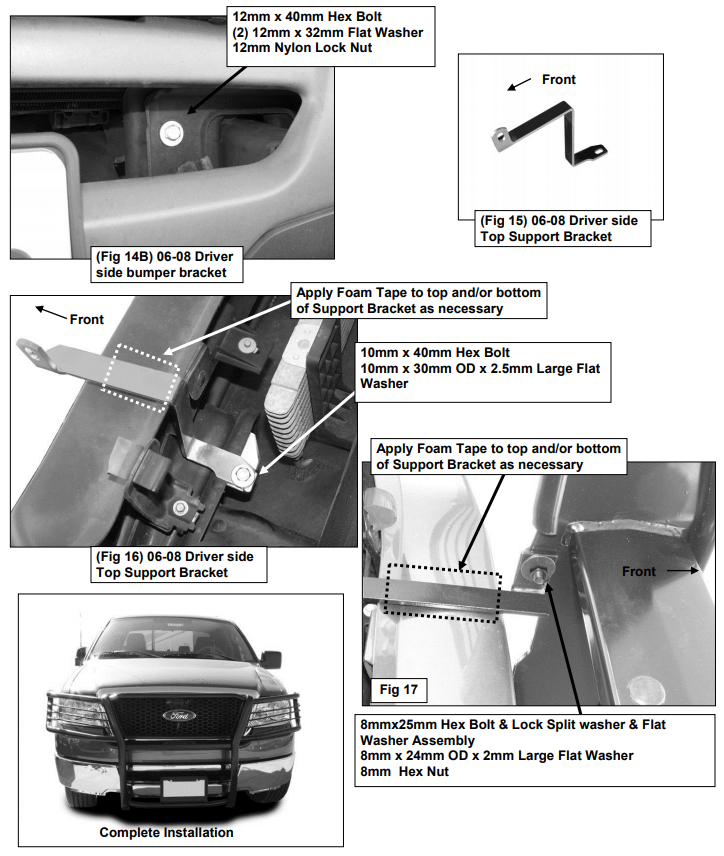
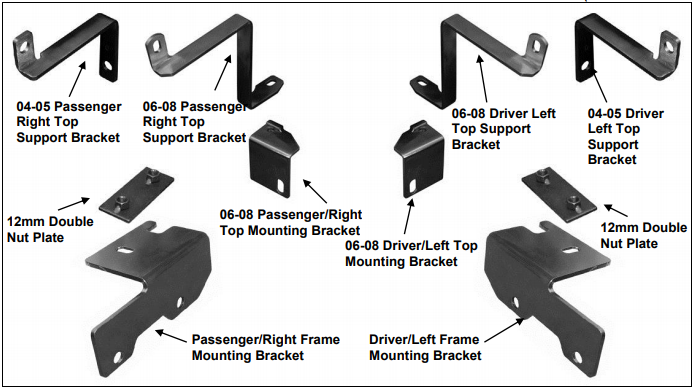
a. Locate the back of the factory bumper bracket, (Figure 12). Select the small driver side 06- 08 Top Mounting Bracket, (Figure 13). Bolt the Bracket to the back of the large factory hole in the bumper bracket with (1) (number 22) 12mm x 40mm Hex Bolt, (2) (number 25) 12mm x 32 mm OD x 3mm Flat Washer and (1) (number 16) 12mm Nylon Lock Nut, (Figures 14A & 14B).
b. Select the driver side 06-08 Top Support Bracket, (Figure 15). Apply a section of the included Adhesive Backed Foam Tape to the Bracket in any location that may come in contact with the bumper or grille, (Figure 16).
c. Bolt the Support Bracket to the top of the Mounting Bracket with (1) (number 23) 10mm x 40mm Hex Bolt, (1) (number 26) 10mm x 30mm OD x 2.5mm Large Flat Washer, (Figure 16). d. Tighten the Top Mounting Bracket to the bumper bracket hardware but leave the Top Support Bracket loose at this time. Repeat Steps a – c for passenger side installation
4. Line up the tab on the driver side Top Bracket with the hole in the upright on the Grille Guard. Insert (1) (number 18) 8mmx25mm Hex Bolt & Lock Split washer & Flat Washer Assembly through the upright and Top Bracket. Secure the Bracket to the Grille Guard with (1) (number 15) 8mm x 24mm OD x 2mm Large Flat Washer and (1) (number 17) 8mm Nylon Lock Nut, (Figures 11 & 17). Leave hardware loose at this time.
5. Repeat Step 4 for passenger side Top Support Bracket to Grille Guard installation.
6. Align and adjust the Grille Guard properly and tighten all hardware.
7. Do periodic inspections to the installation to make sure that all hardware is secure and tight.
To protect your investment, wax this product after installing. Regular waxing is recommended to add a protective layer over the finish. Do not use any type of polish or wax that may contain abrasives that could damage the finish.
For stainless steel: Aluminum polish may be used to polish small scratches and scuffs on the finish. Mild soap may be used also to clean the Grille Guard.
For gloss black finishes: Mild soap may be used to clean the Grille Guard.
Driver Side Installation Pictured
