2021-2025
 2015-2020
 2009-2014
 2004-2008
 1997-2003


Installation Time
(approx) 2 Hours
Difficulty Level:
Light to Moderate mechanical skill required.
Installation Guides
No guide available for this part yet.
 FREE 1 to 3-Day Delivery on Orders $119+ Details
Add Details

 14 Reviews
$389.95 pair
Will this fit your Vehicle?
Saved - View your saved items
We're sorry. We couldn't save this product at this time.
or use
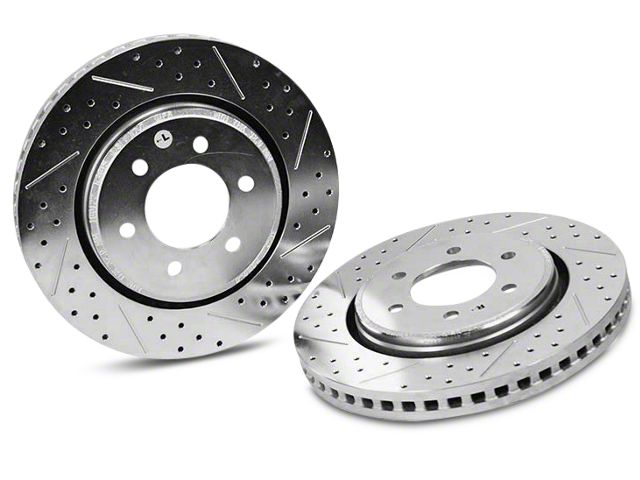
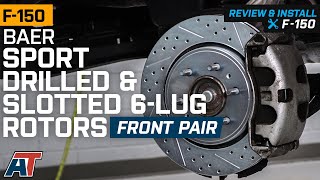
Hey, guys. It's Sara with americantrucks.com and today, we have a review and install of the Baer Sport Drilled and Slotted 6-Lug Rotors for the Front, fitting your '10 to '20 two-wheel drive and four-wheel drive F-150 models. These are perfect for the F-150 owner who's looking for some additional stopping power and wants an upgraded rotor that is both drilled and slotted. These are ideal for the daily driver who wants an upgrade, maybe you have larger wheels and tires like us or you're just looking for some additional stopping power. These get the job done while keeping your brakes cool and clean.This kit consists of both front one-piece, drilled and slotted, zinc-plated, cast steel rotors, with this vented bin design that enhances braking performance and cooling. So, as far as price goes, these come in at around $300, making them about middle of the road price-wise when compared to other options. And keep in mind, these are drilled and slotted where some other options may be one or the other, and they're from a trusted brand while still saving you some money over Baer's more expensive options. I'm giving this install a two out of three wrenches on the difficulty meter. It features direct bolt up install and can be done within three hours. So, with that said, let's jump into our install.For this install, you will need impact guns or a ratchet, a caliper hanger tool, or you can use a bungee cord if you don't have one, 10 and 13-millimeter sockets, and you'll also need a 21. It helps if it's a swivel.All right. So, the first step in our install, with the truck in the air and the wheel off, is to remove the 10-millimeter bolt that's holding on our brake line. This will give our brake line a little more room and so we won't put any tension on it. We're also gonna pop this ABS sensor line out of the brake line just to give it a little more room. So, remember to pop it back in when we're done. Grab your 10-millimeter socket and remove this bolt right here. I'd remove the bracket out of the knuckle. All right. So, the next step is to remove these two 13-millimeter bolts out of the back of the caliper. We have a hanger tool here. You can use a bungee cord if you don't have this, but it's just to keep the caliper out of the way so we're not putting tension on the brake line. So, grab a 13-millimeter socket and remove these two bolts. Make sure your caliper is supported. Keep a hand on it. Once the bolts are out, you can wiggle it loose and hang it off to the side.All right. So, the next step in our uninstall is to remove these two 21-millimeter bolts. Now, if you like, you can leave the caliper in place and just remove these and pull it off as a unit. But I think this way allows you to see the brake pads a little better, see if anything needs to be replaced, and it's not that much extra work. So we just take that out of the way for now. So, grab your 21-millimeter socket. We're using a swivel socket because it makes it a little bit easier here, and remove these bolts. Grab the bracket and remove it off the truck. All right. So at this point, you can remove your rotor. One trick I like to do is I like to throw a lug nut on here for now just because, as you saw when we moved the bracket off, this is ready to come off. Now, if for some reason your rotor is nuts, you can use a hammer, a rubber mallet, and tap around the edge here to loosen it up. Sometimes they get a little rusty and they don't wanna come off.All right. Now that we have the factory rotor uninstalled from our truck, we can check it out side by side with our Baer rotor. And, as you can see, this one is drilled and slotted, so it's gonna increase the performance over your OE. The drilling and slaving helps wipe away dirt and debris, keeping your brakes cool and clean. As I said before, they also add some bite, which is gonna increase the performance of your braking as well. So, with that said, let's finish up our install.All right. So, now we can get the rotor installed on our truck. Now, since these are drilled and slotted, they're directional. So make sure you're grabbing the proper side. We're working on the driver's side, so grab the driver or left side, and Baer has included a nice diagram that helps with that. Now, at this point, it's not a bad idea to hit it with a little Brakleen front and back to get rid of the oils from the factory. Once you've done that, grab your rotor and line it up with your studs. Then, throw a lug nut on there just for safety. Now, you can grab your bracket and line it up over the top of your rotor. Line it up with the holes on your knuckle. Now, although we're not changing the brake pads, it might be a good idea to take a look at them while we're in here and change them if they look low, maybe add a little grease and make sure they're functioning properly. Grab your 21-millimeter socket. Tighten these down.All right. We moved our caliper to the side just to give you guys a better look at the back of that. So, grab your caliper or move it off the hanger. Get it reinstalled over top of your brake pads. Now, keep in mind if you have changed your brake pads, you will wanna push in the caliper. You can do that with a caliper tool or a C-clamp. Because we have not changed the brake pads, this should still slide over the top. Thread in your bolts. Grab your 13-millimeter socket and tighten them down.All right. Once everything is back together and tight, you can reinstall the bracket for your brake line and just go ahead and make sure the pin is in here. Reinstall the bolts, grab your 10-millimeter socket and tighten it down. Don't forget to reinstall the ABS line. All right. So, once this side is complete, you wanna repeat this process on the other side. And when you're done with both, especially if you change your brake pads, go ahead and pump the brakes, test them out before you drive anywhere.But that is gonna do it for the review and install of our rotors. And remember, for all things Ford, keep it at americantrucks.com.
View Full TranscriptNow Playing

2010-2020 F150 Baer Sport Drilled & Slotted 6-Lug Rotors - Front Pair Review & Install
7:18
Subscribe: New F-150 videos daily!
Subscribe to our YouTube Channel
Features, Description, Reviews, Q&A, Specs & Installation
| Brand | Baer |
| Brake Rotor Placement | Front |
Shop All Truck Parts And Accessories
Shop All Truck Brake Rotors
Shop All Truck Brakes
Baer 54153-020
CA Residents:  WARNING: Cancer and Reproductive Harm - www.P65Warnings.ca.gov
Installation Info
Installation Time
(approx) 2 Hours
Difficulty Level:
Light to Moderate mechanical skill required.
Installation Guides
No guide available for this part yet.
What's in the Box