2021-2025
 2015-2020
 2009-2014
 2004-2008
 1997-2003


Installation Time
(approx) 20 Minutes
Difficulty Level:
Simple installation for anyone.
Installation Guides
 FREE 1 to 3-Day Delivery on Orders $119+ Details
Add Details


Verify parts fit & get product recommendations
M-F 8:30A-11P, Sat-Sun 8:30A-9P
 500+ Reviews
3 Answers
500+ Reviews
3 Answers
$50.99 each
Will this fit your Vehicle?
Saved - View your saved items
We're sorry. We couldn't save this product at this time.
or use
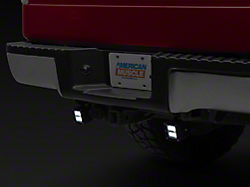
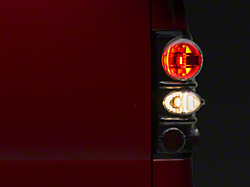
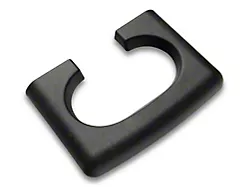
What's going on, ladies and gentlemen? Travis from americantrucks.com, and today we're checking out the most affordable replacement upgrade, Third Brake Light that you can throw on your 2004 to 2008 F150. This is the Axial LED Third Brake Light. Comes in at around $80. There is a chrome option for five bucks, less. It kind of more closely matches the look and feel of the factory brake light. But if you want something that's a little bit more subdued, little more modern-looking, this is gonna be it. Now, as you can see here, we have this really cool kind of cargo light that actually lights up. That's kind of the running light, if you will. So when you put the keys in the ignition, open and close the door, you actually have this little floodlight. It's actually gonna illuminate the cab or the bed area rather, which is really convenient, especially if you're on the worksite at night.Couple other cool things going for it besides the cargo light here, we're ditching those factory bulbs. They tend to get really hot. They can actually melt the wiring harness, and I'll show you guys that in a little bit. But you're getting all LED bulbs in here. That's really nice. They're not gonna flicker or anything like that. They also don't suffer that kind of old fade in and fade out of the factory bulbs either. These should last around 100,000 hours, so safe to say this light will last the life of your truck, a once and done replacement, if you will. Obviously, it's also gonna be a lot more affordable than picking up a replacement from the dealership. And again, you get that nice little floodlight in there for the bed area.This is also plug and play. Even though we're going from those conventional bulbs to LEDs, you have two little pigtail harnesses on the LED lights actually plugged directly into the bulb sockets themselves. So that's creative. You don't have to do any splicing, or soldering, or anything like that.Install's incredibly simple for that reason. I'm gonna give this an incredibly simple one out of three wrenches on the old difficulty meter. Should take you about 20 minutes to get this thing bolted on. So, again, you want a nice little LED upgrade. You want something that's gonna be DOT and SAE-compliant, by the way, 50-state legal, then Axial's got you covered with this really nice LED third brake light upgrade for around 80 bucks. Check it out a little bit more on the site and then come back in a little bit. I'll show you how to get this thing bolted on and wired up in just a second.All right, guys. Like I said, you don't have to wire anything. So all you're gonna need is a Phillips head screwdriver for this one. All right. So once you got your screwdriver here, go ahead and remove the two screws that are securing the third brake light in place. There's one on either side here. Let's just go ahead and pop these out real quick. And then once you have both of those screws removed, you just wanna gently kind of pull up on the light here. Might be seated a little bit because of the weatherstripping in there, so you might need a plastic trim panel tool to remove it. Once you have the light removed here, all you need to do really is actually pop out the wiring harness here. So just rotate those a little bit, counterclockwise to remove all the bulbs.All right. So before we throw the new light in, I just wanted to kind of put them side by side, show you nice little comparison about what I was talking about earlier. You could see how much more modern this one looks, obviously, since we're ditching these old and busted bulbs here. These LEDs just look a lot cleaner. Looks a lot more modern. When it's actually lit up, you have that nice kind of crisp oval there. And then obviously, these old bulbs, they have kind of that fade in and out thing going on. They don't look too good. They just look old. This is gonna look a lot more modern. We also have a nice kind of subdued kind of matte finish on here. Almost gives it kind of a smoke finish. So this is a little more understated than this thing. You got all these white reflectors in here and just kind of looks nasty, right? So we can go ahead and ditch this guy. We don't need to take any hardware off of here. We do need to pop out the bulbs from our wiring harness because the new LEDs, they actually just clip right into the bulb sockets. Let's go ahead and gently release all these bulbs from the wiring harness.Okay. So the bulbs are just kind of pressed in with these little plastic tabs on either side, you just got to gently wiggle them out to release them. While I'm doing this here, you can kind of see how these bulbs get really hot, they kind of burn the wiring harness, almost. Isn't gonna be a problem with these LEDs. They are not gonna get anywhere near this hot and they do last about 100,000 hours. So you're not gonna have to worry about them burning out on you anytime soon. So like I said, these little harnesses, they just kind of plug into the actual sockets here. The reverse light's gonna go into the middle socket. Press it in like so. You'll hear a nice little click there. And then the fog light here, just a little harness labeled fog light can actually go into either one of the other sockets. And then you have a third one. That's just gonna be unused. So we're gonna tuck him underneath the cab when we go to put this back in place. All right. So once you got those connected again, just go ahead and get all your wires tucked up underneath here and get your light seated back in place. Okay. Now, simple thing here, let's go ahead and get those screws back in place. Kind of get them lined up with those speed clips down there and then just get them both threaded down.All right. So once you got both of those bolts in there, you got this thing seated down nice and tight, go ahead and open the door and make sure the floodlight works, press the break once or twice, make sure the LEDs are lightened up. That'll wrap up this very easy install. And that also wraps up my quick little review of Axial's LED Third Brake Light, fitting your 2004, 2008 F150. Be sure to check it out more on the site and for all things F150, keep it right here at americantrucks.com
View Full TranscriptNow Playing

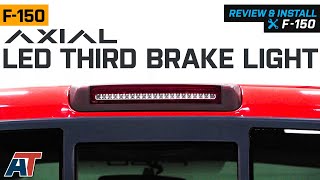
2004-2008 F150 Axial LED Third Brake Light Review & Install
5:01
Subscribe: New F150 videos daily!
Subscribe to our YouTube Channel
Features, Description, Reviews, Q&A, Specs & Installation

Shop All Truck Parts And Accessories
Shop All Truck Brake Lights
Shop All Truck Lights And Cargo Lights
Fitment:
Raxiom T539492
CA Residents:  WARNING: Cancer and Reproductive Harm - www.P65Warnings.ca.gov
Installation Info
Installation Time
(approx) 20 Minutes
Difficulty Level:
Simple installation for anyone.
Installation Guides
What's in the Box
Review Summary


Installation Time: Less than 1 Hour
Mar 8, 2025
Works as Advertised
The only thing that caught me off guard was just how much brighter it is (That is good). No more replacing bulbs is nice too.
Aug 17, 2024
So much better than what was!
Raxiom third brake light installation is very simple. 2 screws out, unplug old unit, plug in the new, 2 screws back in and done! Takes less than 5 minutes to transform from (in my case) a weather beaten lens to a stylish upgrade!
Aug 2, 2024
Perfect brake light
It looks great on my truck works great very bright makes truck look stealthy
May 2, 2024
Great for price and looks good
I originally had an fleabay LED until I got pulled over for being over a few weeks back. the board had separated. I had purchased new LED headlights CAI and other items here at AT so viewed third lights and chose this one. Nice that it was one of the least inexpensive too! Installed per instructions and the light did all kinds of stupid stuff. Watched the video again and checked leads. Found out the labels were opposite. Switched the wires and perfect! Works and looks better than stock or the old fancy led that quit on me and almost got me a ticket. What I like best is its obviously an upgrade but doesn't have that "weird" LED look. Very nice and thanks AT!
Feb 15, 2024
Works Great
Big improvement over the stock chrome housing with halogen lights. The slightly smoked bezel blends well with the truck and the LEDs look great. Bed light is nice and bright which is nice too.
Mar 12, 2023
Great product
It's extremely bright and looks amazing. It took about 5 minutes to install
Feb 18, 2023
Better seal and Higher quality than factory
The OEM Ford light looks like cheap junk when you compare them side by side. The seal goes all the way around the screw holes and the rest as one piece, no breaks. The look on the truck is more modern and classy. I wish I could see how good it looks while driving.
Jan 2, 2023
Third brake light
Both cargo and brake led lights are super bright! Easy to install 2 screws hold it in place.
Mar 18, 2021
Awesome 3rd Brake
Red LED illuminates brightly and even my co-workers agreed. When using the Cargo Light, the Bright white LED perfectly illuminates the bed of my truck so I can see everything and know what I need to grab for. Easy to Install, just a matter of unplugging the bulbs and plugging the wiring into the bulb fixture, then seating it back into position.
Aug 25, 2020
LED third light
Bought the new setup to replace my old bulb light and the result was fantastic and looked great on my F150
5 Top Rated Questions
Q: Does it turn on with the parking lights as well or does it only turn on when braking?
A: This only functions as a brake light.
Q: How is the weather stripping? I'm looking for a replacement of my factory light due to it's bad water proofing.
A: The high quality weatherstripping will keep out moisture from the housing.
Q: Do you make the same light with a chrome housing?
A: We do not currently have the same light with a chrome housing.