2019-2025
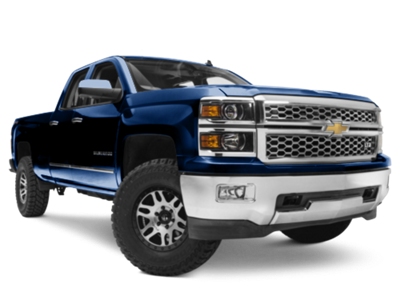 2014-2018
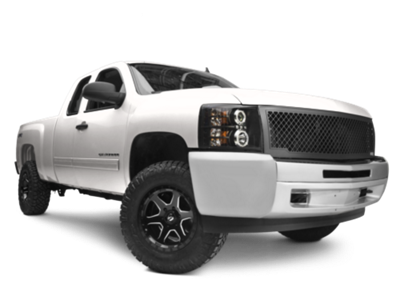 2007-2013
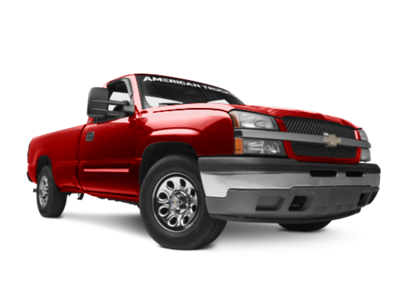 1999-2006


Installation Time
(approx) 2 Hours
Difficulty Level:
Simple installation for anyone.
Installation Guides
No guide available for this part yet.
 FREE 1 to 3-Day Delivery on Orders $119+ Details


Change Vehicle Color In Photo
Select Your Color
Verify parts fit & get product recommendations
M-F 8:30A-11P, Sat-Sun 8:30A-9P
 500+ Reviews
$249.99 pair
Will this fit your Vehicle?
Saved - View your saved items
We're sorry. We couldn't save this product at this time.
or use
Add Local Installation
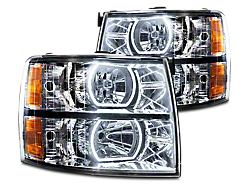
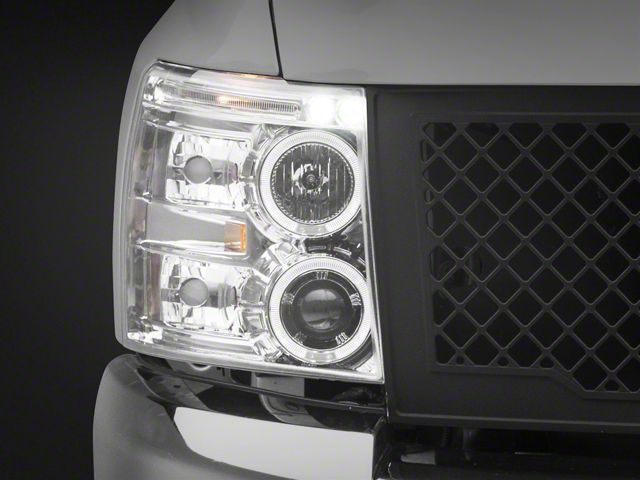
Hey guys, it's Sara with americantrucks.com and today we have a review and install of these LED Halo Projector Headlights in Chrome fitting your '07 to '13 Chevy Silverado 1500s. These are perfect for the Silverado owner looking for a budget friendly LED headlight and likes the look of the chrome styling. These projectors style headlights with amber reflectors enhance the brightness over OEM for better visibility. These headlights are constructed with clear lenses and chrome housings and also include LED halos as well as two LED accent lights. These headlights include H1 high and low beam bulbs and are also DOT and SAE compliant. So as far as price goes, these come in at around $275 putting them on the lower end price-wise when compared to other headlights. And for your money, you're getting an LED headlight with this chrome styling that's going to save you some money over more expensive options. I'm giving this install one out of three wrenches on the difficulty meter. These headlights feature direct bolt up install but some minor wiring will be required. With that said this can be done within two hours. so let's jump into our install.All right. For this install, you will need ratchets, a 10-millimeter socket, a 7-millimeter socket, a 10-millimeter ratcheting wrench, pop clip removal tool, a wiring stripping and crimping tool and you may want some spade connectors. All right. So the first step in our install is to grab a pop clip removal tool or a flathead screwdriver and remove all the pop clips holding in the plastic rad support cover. Now you can go ahead and remove this cover. At this point, we can grab a 10-millimeter socket and remove the four bolts that hold on the top of our grille. All right, so now that the bolts are removed from the top you can grab the grille and pull it straight out. Now if these clips won't release, you can use a flathead. With the grille removed you can now remove the two 10-millimeter bolts holding on the top of your headlight.All right. So the final bolt that's holding in our headlight is right in between the bumper and the fender. Now this one only has to be loosened because the headlight is notched and it can slide forward once it's loose. To get to this, you can go underneath through the bumper but I think it's a little easier if you just loosen these bolts and go in through the wheel well liner. So grab a 10-millimeter socket and loosen up the two bolts that hold in your wheel well liner at the front. All right. So we're going to use a ratcheting wrench for this bolt. It is pretty tight in there and without removing anything else we can't really get on it as good. Go ahead and loosen it up a little bit. Like I said before, you don't need to remove this because the headlight is notched. So once the bolt is loose, we can pull out the headlight. All right. So there are two pins at the back of the headlight so you want to grab it and pull it straight towards you and once it's released just tilt the headlight down and forward and it should come out. Go ahead and release this main connector.All right. So before we can install our new headlight, we need to move over the wiring harness on our factory headlight as well as the amber bulbs. Now I have gloves on here because we are going to reuse the bulbs, you don't want to touch them. These oils in your fingers can shorten their life. So go ahead and twist out the bulbs first. Now if you don't have gloves, you just be careful not to touch the bulb. Set them off to the side. Disconnect these two connectors. Now you can move over the harness to your new headlight. We're going to start with the amber bulbs. Now there is one larger tab on the backside here, just line that up with the larger opening so it makes it easier to twist into place. Do the same thing with your other light. All right. Now these are not the same as the factory. Your factory green and black connector is going to go to this red and black one, they have a similar tab on them. And then the black and green is going to go to the yellow and black. And again these have a similar tab on the side this other connector does not have. All right now we can wire up our LEDs.All right, so all these loose wires power the LED accent lights. So we can actually wire all of these together, all the grounds together, all of the power wires together to make it a little more simple. Now there's lots of different ways to wire up these LEDs so if you don't like the way I'm doing it, you can definitely do it another way that you're comfortable with. As long as all the black wires are getting ground and the white wires are getting power, you should be good to go. We're going to tap into the existing harness on the truck so that the LEDs come on with the running lights. So once all the ground wires are twisted together, grab a spade connector, this is the male end. Make sure the wires are all in this section, that there's a nice connection and then we're gonna grab a crimping tool and crimp this down. Just ensure you have a good connection on all the wires by giving them a tug and as long as nothing moves, you should be good. All right, now we're going to do the same thing with the power wires. So the strategy I'm using is to just fray these ends a little bit. I think it helps them to get a better connection. But if you like the tight twisting method, you can definitely use that one as well as long as all these wires are getting a nice connection, that's what we're aiming for.Now we're going to add the spade connector the same as the ground. Now these are heat shrink, if you like you can use the heat shrink kind, they seal to the wires, it'll help keep moisture out. There's also kinds that don't heat shrink and then, of course, there is soldering. So however you want to attach this to get power to these wires is perfectly fine. And again, we're just going to check each one of these wires that there's a nice tight connection, none of them are going to pull out. And if you like you can grab a heat gun or another heat source, even a lighter will work, and just shrink these down to get the good connection there on the wires.All right. So this has previously been done on our truck, but I can show you what they did here. They're tapping into a ground wire on this connector and also this brown one right next to it with the blue, this one is power. So they're tapping into our running lights to give the LEDs power. Again as long as they have power and ground they should work fine. So just tap into these if you'd like and then we're going to plug these in. Brown is power so we're going to the white wires. Now you can hardwire these in like soldering or permanently butt connector, but I like this spade connector because then you can remove this headlight without having to cut wires. You're connecting the ground wires, the black ones, together. All right. Now we don't forget to reconnect this main harness plug.All right. Now tuck up your wiring, there is a little bit more than the factory, so you want to make sure it's neatly in there. Use some zip ties if you'd like and then we're aiming for this headlight, this tab down here to go into this pocket and also the tab on our side that we loosened the bolt for, you want to connect both of those as well. In addition, same as the factory, there are two plastic tabs at the back of the headlight that are going to go into the truck as well. All right, once you push it in place, we can reinstall our hardware.All right. Now we can reinstall the hardware. All right. Now with our 10-millimeter ratcheting wrench, we're going to tighten down the bolts that's in the wheel well area on the side of our headlight. Then reinstall the two bolts that hold on our wheel well liner.All right. Now that we have our factory headlight uninstalled from our truck, we can check it out side by side with this aftermarket headlight. And as you can see, they both feature a similar chrome styling to them but our new headlight features a projector-style lens which differs from the factory reflector style. Where the reflector sort of spreads the light out the projector-style has a more concentrated beam of light. And in addition, this does feature LEDs as well which are going to outlast the life of your factory bulbs.All right. Now we can remove our headlight on the other side starting with the two 10-millimeter bolts up top. Grab your socket and remove them. All right. Now we can remove the two bolts that hold in the front part of our wheel liner. All right. Now we can get our 10-millimeter ratcheting wrench and same as the other side, just loosen up this bolt in here. You don't have to completely remove it. Just loosen it up so the headlight can slide past it. All right. We're gonna pull our headlight straight out and then tilt it so we can remove it off the truck. Don't forget to disconnect this large connector, and our headlight is free. All right. Now we can move the wiring harness from our factory light, disconnect both of these connectors and then we're going to twist out the amber bulbs. All right. Now we can attach the wiring harness to our new headlight starting with the amber bulbs. Line up the tabs, and twist them in. Now we can attach these connectors. The yellow and black is going to go to our blue and black. Now this can be swapped so just be aware of what side you're connecting it to. And the green and black is gonna go to the red and black. All right. Now we can wire up our LEDs the same as the other side, attaching all the ground wires together. You can wire these individually but they're all going to the same place so it does simplify it a bit to just wire them all to one. Crimp it down. Just double-check that your connections are all good on each wire and I can move on to our power wires. Attach our connector and crimp it down. Just double-check the connection is good. You'd rather these pull out of the connector now than on the truck.All right. So before we can install our headlight we do want to plug in the wiring that we just did, making sure we're going with ground to ground, they will both be black wires. And the power wire in this situation is brown so we're going with the white power wires to the brown power wire on our truck.And make sure we're attaching the large factory connector, tuck up the remainder of your wiring out of the way and line up the headlight on your truck. Now we're lining up the two pins, the two plastic pins at the back, the tab that we loosened the bolt in the side and the wheel well and also there's a tab down the bottom here. It also has to be lined up as well. Go ahead and push it into place. Now we can attach with our factory bolts.Once our headlight is lined up, we can install the factory hardware. And using a 10-millimeter socket tighten these down. Now using your 10-millimeter ratcheting wrench tighten down the bolt that you loosened in between the fender and the bumper. Reinstall the bolts holding in your wheel well liner.Grab your socket and tighten them down.All right. With both of our headlights installed, we can reinstall the grille. Line up all the metal clips on the back, press it into place and then install the hardware up top. Grab your 10-millimeter socket and tighten these down. All right. Now I can set down our rad support cover and reinstall the pop clips. Line it up with the holes for the clips and install them.All right. So once this is replaced you can go ahead and shut your hood and that's gonna do it for the review and install of these headlights. And remember for all things Silverado, keep it at americantrucks.com .
View Full TranscriptNow Playing

2007-2013 Silverado 1500 LED Halo Projector Headlights - Chrome Review & Install
17:25
Subscribe: New Silverado 1500 videos daily!
Subscribe to our YouTube Channel
Features, Description, Reviews, Q&A, Specs & Installation
| Headlight Type | Projector |
| Headlight Housing Color | Chrome |
| Headlight Lens Color | Clear |
| Headlight Style | Aftermarket Style |
Warranty. There is a 1-year warranty on this product.
Application. These Chrome Dual Halo Projector Headlights with LED Accents are designed to fit 2007-2013 Chevrolet Silverado 1500 models. Driver and passenger side lights are included.
Shop All Truck Parts And Accessories
Shop All Truck Headlights
Shop All Truck Lights And Cargo Lights
CA Residents:  WARNING: Cancer and Reproductive Harm - www.P65Warnings.ca.gov
Installation Info
Installation Time
(approx) 2 Hours
Difficulty Level:
Simple installation for anyone.
Installation Guides
No guide available for this part yet.
What's in the Box
Review Summary


Installation Time: Afternoon
Sep 12, 2019
New lights look great
Installed new LED lights on my 2011 Silverado. They are not only brighter, they make the truck look newer. I would do it again.
Jan 6, 2025
Review shared from Dual Halo Projector Headlights; Chrome Housing; Clear Lens (07-13 Silverado 1500)
My son loves the new led lights
Customer Service was great, I put in a PO Box for shipping address and Customer service call me and fixed my order and made sure it was delivered by Christmas for my son
Sep 3, 2024
Review shared from Dual LED C-Bar Projector Headlights; Matte Black Housing; Clear Lens (07-13 Silverado 1500)
New head turning head lights
Super easy install , wicked look and super impressed with performance no buyers regret here
Aug 5, 2024
Review shared from Dual Halo Projector Headlights; Chrome Housing; Clear Lens (07-13 Silverado 1500)
Great looking lights
From the ordering to the actual product I'm very satisfied. The lights came very well packaged and protected. Installed they look great on my truck. Brightness is great just overall happy with the purchase. Installation took about an hour after watching the video provided on the website with the product.
Jun 3, 2024
Review shared from Dual LED C-Bar Projector Headlights; Matte Black Housing; Clear Lens (07-13 Silverado 1500)
Duel led c bar headlights
Item looks awesome on my truck. The install and fitment went great. Less than an hour to install.
May 27, 2024
Review shared from Dual Halo Projector Headlights; Chrome Housing; Smoked Lens (07-13 Silverado 1500)
Headlights
I love the look of the headlines on my truck takes a little while to install considering you have to take half the front end off to get the other ones out in the new ones in
Aug 29, 2023
Review shared from Dual LED Halo Projector Headlights; Gloss Black Housing; Smoked Lens (07-13 Silverado 1500)
Head lights
It was really easy to install. Lights look amazing and there awesome on the road
Jul 16, 2023
Review shared from LED C-Bar Projector Headlights; Jet Black Housing; Clear Lens (07-13 Silverado 1500)

Headlights
Install was quick and easy, lights are not as bright as I thought they would be but overall love the look of them!!!
Mar 11, 2023
Review shared from LED C-Bar Projector Headlights; Jet Black Housing; Clear Lens (07-13 Silverado 1500)
Works but not bright
The product is very nice and everything fits if you want to see at night better carry a mag light because the lighting is horrible
Dec 30, 2022
Review shared from Dual LED Halo Projector Headlights; Gloss Black Housing; Smoked Lens (07-13 Silverado 1500)
Fantastic for the money
These headlights were a seamless install from my factory headlights for my 2010 Silverado. It took a little longer because my factory headlight harness wasn’t tapped for LEDs, but with the vampire clips the headlights came with made it very easy to power them. The goal is to black out my truck and these headlights are a great addition!
Sponsored